How To Finish OSB Garage Walls? A Detailed 7-Step Painting Guide
As an Amazon Associate, I earn from qualifying purchases.
How To Finish OSB Garage Walls?
Your garage, your rules! Unfinished OSB garage walls do have an industrial charm, but you don’t have to settle for the raw industrial vibe. Why not finish OSB garage walls to elevate the looks and transform your garage into a more livable space?
There are, at least, six techniques to finish OSB Garage walls: painting, staining, varnishing or sealing, applying wallpaper, creating a textured finish, and installing wall panels.
Painting OSB (Oriented Strand Board) walls in your garage is an excellent way to boost both appearance and durability. OSB is a popular choice in garages and utility spaces because it’s sturdy and cost-effective.
However, OSB’s unique texture and porous surface require specific preparation and finishing techniques for the best results.
In this article, I will give you a step-by-step guide on how to paint OSB interior walls, especially in a garage. Painting is the most popular option and will result in a garage you will love!
What is OSB (Oriented Strand Board)?
OSB, or Oriented Strand Board, is an engineered wood product made by compressing layers of wood strands and adhesives.
This structure gives OSB impressive strength and moisture resistance, making it an affordable and durable option for interior walls in garages.
Unlike plywood, OSB has a rougher surface with visible wood strands, knots, and grooves. Its unique texture and composition require careful preparation to ensure an even, lasting paint finish.
Why OSB Needs Special Preparation Before Painting
Due to its characteristics, OSB needs extra attention before painting. Here’s why:
- Porous Surface: OSB absorbs moisture and paint unevenly, leading to blotchy results and a shorter-lasting finish without proper sealing.
- Rough Texture: The textured surface of OSB causes paint to settle unevenly, often highlighting imperfections if not prepped correctly.
- Tannin Bleed: OSB contains natural tannins that can bleed through paint, causing yellow or brown discoloration over time. Using a stain-blocking primer is essential to prevent this.
Benefits of Painting OSB Walls in a Garage
Painting OSB walls in your garage offers a range of advantages:
- Improved Appearance: A coat of paint adds a clean, polished look to OSB walls, reducing the rough, raw appearance of bare wood.
- Increased Durability: Sealing and painting OSB walls adds a protective layer against moisture, spills, and abrasions, helping them stand up to wear and tear.
- Better Light Reflection: Painted walls, especially in lighter shades, reflect more light, brightening up the space and making it easier to work on projects.
OSB is often compared with plywood, for a reason. Both are engineered wood panels. OSB uses wood chips while plywood is made from wood veneers. Adhesives, under high pressure & temperature, bond with the wood to form the panels.
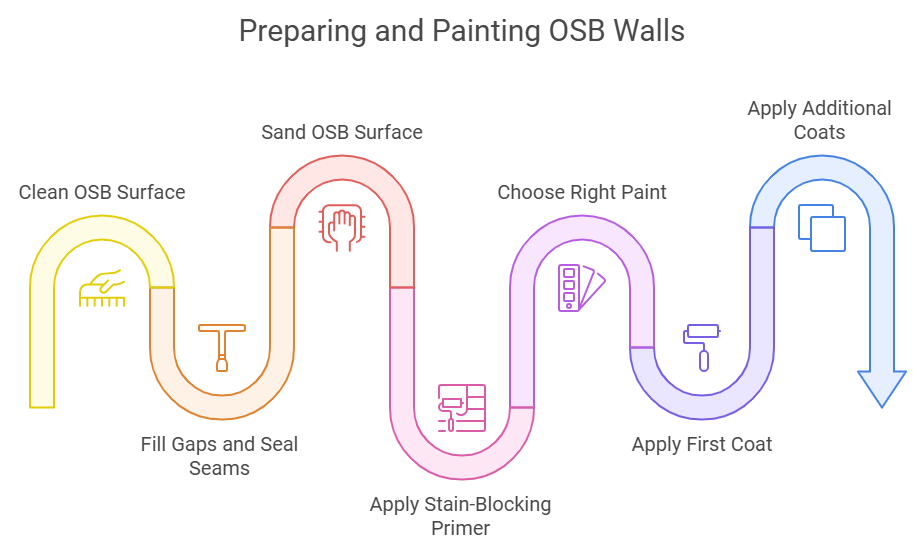
To finish your OSB garage walls using paint you need to PREP, PRIME, and PAINT. This is how you do it.
Materials and Tools Needed for Painting OSB Walls
Essential Tools for Painting OSB
Ensure that you have all the necessary tools before starting your painting project. Here’s what you’ll need:
- Paint Rollers and Brushes: Use a high-quality roller for large areas and angled brushes for edges and detailed areas. You will need a couple of paint trays too.
- Painter’s Tape: Tape off areas where you don’t want paint to avoid accidental spills.
- Orbital Sander: with 120-grit or 80-grit sanding pads
- Sandpaper: Medium-grit (100-150) sandpaper is ideal for smoothing rough areas of OSB before priming.
- Caulking Gun: For applying caulk to seal gaps and seams, which will help create a more even finish.
- Drop Cloths or Plastic Sheeting: Protect the floor and nearby items from paint drips and spills.
- Protective Gear: Gloves, goggles, and a dust mask help keep you safe, especially while sanding or applying primer.
Choosing the Right Primer and Paint for OSB
Selecting the right primer and paint makes a significant difference in durability and finish:
- Stain-Blocking Primer: A stain-blocking primer is essential to prevent tannins in OSB from bleeding through. Look for a latex or oil-based primer labeled as “stain-blocking” or “moisture-resistant.”
- Acrylic or Latex Paint: Choose high-quality latex or acrylic paint. Both options adhere well to primed OSB and offer durability in environments like garages.
- Finish Type: Semi-gloss or satin finishes are ideal for garage walls as they provide moisture resistance, are easy to clean, and enhance light reflection.
Additional Supplies
- Wood Filler or Caulk: For filling visible seams and gaps, which helps achieve a smoother finish.
- Clear Coat Sealer (optional): An extra layer of protection for added durability, especially if your garage is exposed to humidity.
Preparing OSB Walls for Priming & Painting
The right preparation makes a huge difference to the durability and the final finish of the painted OSB garage walls. Follow these steps for optimal results.
Step 1: Clean the OSB Surface
- Dust and Remove Debris: Start by dusting off the walls with a dry cloth or shop vacuum to remove loose dirt and sawdust.
- Wipe Down the Surface: Use a damp cloth to wipe away any stubborn dust. Avoid soaking the wood, as OSB can absorb water quickly. Let the surface dry completely before moving to the next step.
Step 2: Fill Gaps and Seal the Seams
- Inspect for Gaps: Look for any gaps, seams, or visible cracks on the surface.
- Apply Caulk or Wood Filler: Use a caulking gun to apply caulk along seams and edges. For larger gaps, use wood filler, applying it with a putty knife for an even finish.
- Smooth and Let Dry: Smooth the caulk or filler with a damp finger or tool, and allow it to dry according to the product’s instructions. This step prevents cracks from showing through the paint and gives a uniform look.
Step 3: Sand the OSB Surface
- Lightly Sand the Walls: Use medium-grit sandpaper (100-150 grit) to smooth the rough surface of the OSB. This is a labor-intensive process, hence the use of an Orbital Sander can make it a lot easier. Sanding helps reduce visible strands and rough spots, giving the primer a more even surface to adhere to.
- Dust Off Again: After sanding, use a vacuum or dry cloth to remove any dust left on the surface. A clean, dust-free wall is essential for good primer adhesion.
I recommend using DEWALT Random Orbit Sander. It will reduce your work load and give a more uniform result.
DEWALT Orbital Sander
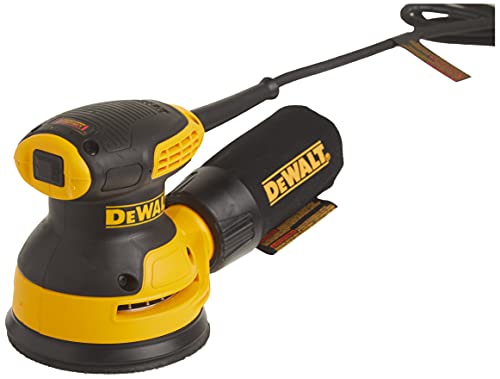
- Powerful Motor: The 3-amp motor delivers 12,000 OPM for efficient sanding.
- Comfort and Control: Reduced vibration with a rubber grip for comfort.
- Enhanced Dust Collection: Short design for close work; includes a one-handed locking dust bag or can connect to DWV010/DWV012 dust collectors.
Pro Tips:
Moisture Check: Use a moisture meter, like Tavool Wood Moisture Meter, to ensure OSB moisture is 10-12%. If high, reduce by using a portable convection heater.
Sanding Safety: Sanding OSB creates dust; wear a face mask, ventilate the garage, and clean frequently with a shop vac, like Craftsman 10 gallon portable Shop Vac.
Dust Removal: Use a rag with white spirit to remove the remaining dust from OSB, ensuring primer adhesion.
Priming the OSB Garage Walls
Primer is always a very important part of paint application. When you finish an OSB garage wall, a good sealer & primer is critical to getting a good finish.
Step 4: Apply a Stain-Blocking Primer
- Choose the Right Primer: Select a stain-blocking, moisture-resistant primer suitable for OSB. It is best to use an oil-based primer (also known as alkyd primer) rather than a water-based primer.
- Apply the Primer Evenly: Use a roller for larger areas and a brush for edges and corners. Apply a thin, even coat, working in manageable sections.
- Allow to Dry: Let the primer dry completely, as recommended on the product label. This step is crucial for sealing the OSB surface and blocking any potential stains from bleeding through.
OSB is extremely porous. It absorbs water or paints like a sponge. Water absorption is never good for OSB as it will swell up. Warping, mold growth, and termite attacks are a few of the problems that you will face if the OSB is wet or has high moisture content.
A good OSB primer must also have a high %age of volume solids. The primer needs to have a high hiding capacity to cover up the flake pattern in OSB panels.
INSL-X Prime Lock Plus from Benjamin Moore is an alkyd that primes and seals plaster, wood, drywall, and previously painted or varnished surfaces.
INSL-X Prime Lock Plus has almost 60% volume solids. This primer can therefore hide the flake pattern of the OSB better than most other primers.
INSL-X Prime Lock Plus ensures the paint top coat has consistent sheen and appearance (excellent enamel holdout), seals even the toughest stains without raising the wood grain, and can be top coated with any latex or alkyd finish coat.
INSL-X Prime Lock Plus Alkyd Primer

INSL-X PS800009A-01 Prime Lock Plus Alkyd Primer
Prime Lock Plus Primer/Sealer/Stain Blocker is a high hiding, alkyd-based, interior primer, sealer, and stain blocker for interior paint primer applications and spot coating outdoor surfaces.
Excellent interior paint primer for plaster, drywall, wood, and previously painted or varnished surfaces. It can be top-coated with any oil or latex paint.
Click to download the Technical Data Sheet.
Painting OSB Walls of a Garage
Now that your OSB walls are prepped and primed, it’s time to start painting. Selecting the right paint is the first step in this process.
The nice thing about INSL-X Prime Lock Plus primer is that though it is oil-based, it can be overcoated with either a water-based acrylic or an oil-based alkyd top coat.
Flat white is ideal for garage ceilings as it reflects the recessed ceiling lights and makes your garage look bright. Eggshell sheen interior paint in the color you prefer is great for the walls.
Step 5: Choosing the Right Paint
- Paint Type: For OSB garage walls, use high-quality acrylic or latex paint. These paints adhere well to primed OSB, dry quickly, and are easy to clean.
- Finish Selection: Opt for a semi-gloss or satin finish. These finishes not only add a slight sheen but also provide moisture resistance and are more washable—important for a space like a garage.
- Color Choice: Lighter colors are generally better in garages as they reflect light, making the space feel larger and brighter. Neutral or light shades can also help mask minor imperfections in the OSB.
Step 6: Applying the First Coat
- Use the Right Tools: Use a high-quality roller for large areas and an angled brush for edges and tight spots. Choose a roller with a medium nap (about 3/8 inch) to help with coverage on the textured OSB surface.
- Apply Paint in Thin, Even Layers: Start from the top of the wall and work your way down in even strokes. Aim for a thin, even layer to avoid drips and uneven patches.
- Work in Sections: Divide the wall into sections, painting one area at a time. This approach helps ensure that paint dries evenly and makes it easier to keep track of coverage.
Step 7: Applying Additional Coats for Durability
- Let the First Coat Dry Completely: Allow the first coat to dry according to the paint label’s instructions. Drying times can vary, but it’s generally best to wait at least 2-4 hours to ensure the paint is fully set.
- Apply a Second Coat: After the first coat has dried, apply a second thin coat. This additional layer will even out any inconsistencies and add to the wall’s durability.
- Consider a Third Coat (Optional): If your OSB walls are highly textured or if the color appears uneven after the second coat, a third coat may be necessary. Additional coats improve both appearance and longevity, particularly in high-traffic areas.
By using multiple thin coats, you’ll achieve a smooth, consistent finish that will better withstand the demands of a garage environment.
After you’ve finished applying your coats, give the paint ample time to cure before moving to the next step.
Thank you very much for reading the post. I do hope you found it informative and useful.