How to Add Bathroom to Garage? A Detailed Step-by-Step Updated Guide
As an Amazon Associate, I earn from qualifying purchases.
Is it Difficult to Add Bathroom to Garage?
If you have a workshop or a gym in your garage, chances are you have felt the need for adding a bathroom in your detached garage. So can you do it? How hard is it?
Adding a bathroom in a garage is difficult, but not impossible. It’s a lot of work, but it can be done.
Key Takeaways for Adding a Bathroom in a Garage
- Adding a bathroom in a garage is challenging but achievable.
- Benefits: convenience, comfort, and increased home value.
- Design a compact, functional layout.
- Obtain a building permit before starting.
- Key utilities are, plumbing, drainage, electrical, ventilation, and insulation.
- Position in a garage corner, close to house, to reduce cost and time.
- Expect basic costs from $3,000–$6,000, more for detached garages.
So to put a bathroom in your detached garage, start by checking on the building code and getting the permit to build.
Arranging for the utilities, especially water supply & drainage will take effort, time and money.
Bathroom fixtures & fittings, wall framing, tiling, etc. are other important costs to include in your budget when adding a bathroom to a garage.
To be honest, it won’t be easy or cheap, but the rewards will be well worth it! Adding a bathroom to a garage will let you take a shower and get ready after working on your DIY project or working out in you garage gym,
All without the need to leave the garage and go back to the house.
Benefits of Adding a Bathroom in a Garage
Adding a bathroom in a garage can be a great way to improve the convenience, value, functionality, and comfort of your home.
- Convenience: Ideal for mechanics, hobbyists, or anyone working in the garage.
- Increased Home Value: Makes your home more appealing to buyers and boosts livability.
- Added Functionality: Can serve as a pool bathroom, mudroom, or shower room for outdoor work or pets.
- Enhanced Comfort: Great for guests, or family using the garage for workouts or hobbies.
In this post I show you, one step at a time, how to put a functional bathroom in your detached garage. So, let’s get started.
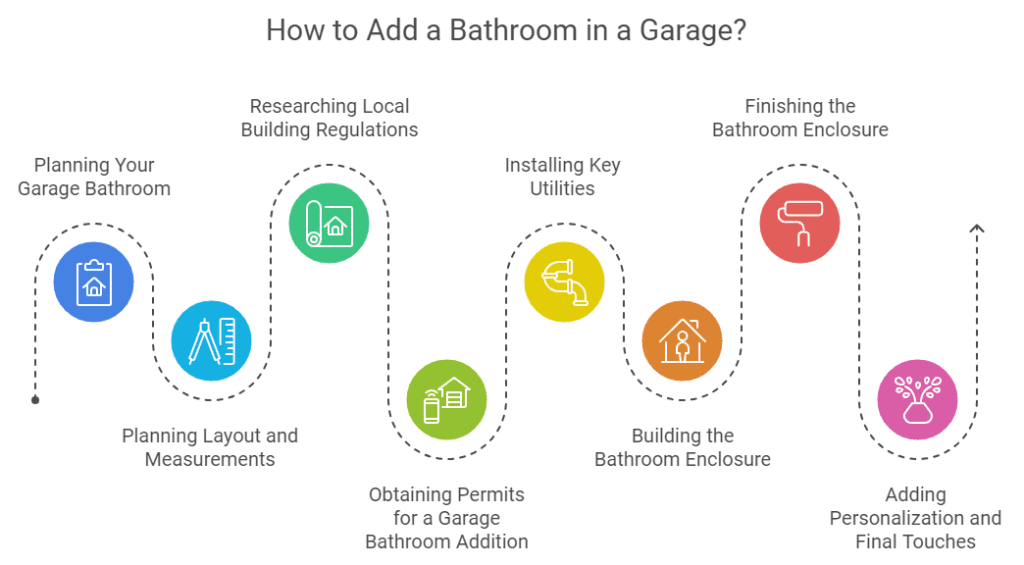
Step 1: Planning Your Garage Bathroom
Before starting construction, you have to have a build plan. This will be based on the purpose, layout, and features for your garage bathroom. Anyway, you need a detailed plan to submit to local authorities to get a permit to build.
- Permits ensure that your project complies with local laws and codes.
- Permits protect you and your property from potential fines or legal actions.
- Lack of proper permits can affect the sale of your property in the future.
Key Considerations
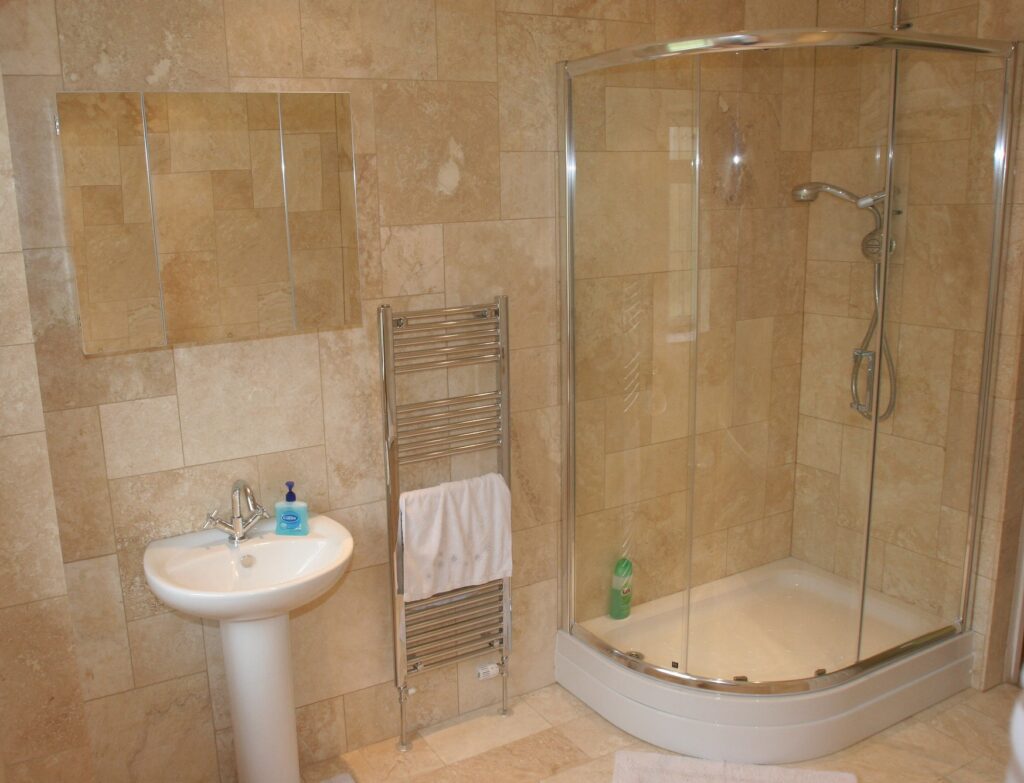
Purpose and Use: Determine who will use the bathroom and what features are necessary. A simple half-bath may suit a workshop, while a guest bathroom would need a shower and hot water.
Essential Components
- Sink: Choose a utility sink, if space permits. You can get a lot done with a utility sink in a garage. However, a smaller basin will do for limited spaces.
- Toilet: If the garage is far from the main sewer line, consider an up-flush toilet, which pumps waste to the sewer line without extensive plumbing.
- Shower: For guest use, add a compact corner shower. Plan for a small water heater if hot water is required. This is a great addition if you have a garage gym.
Additional Features
You must have proper ventilation to prevent moisture buildup. Think of storage for supplies, and future needs like laundry hookups.
Step 2: Planning Layout and Measurements
It is time to get into the nitty-gritties. Carefully planning the layout and taking precise measurements will ensure your garage bathroom is efficient, comfortable, and meets code requirements.
Choosing the Location
When choosing the bathroom’s location within the garage, consider accessibility to water lines, drainage, and electrical wiring.
Placing the bathroom in a corner, closer to the house will reduce the cost of plumbing, drainage, and electrical installation. A corner bathroom in garage also means that you just need to build two walls.
Layout and Dimensions
In my opinion you can get a decent bathroom in a 4’X8’ corner of your garage (see layout below).
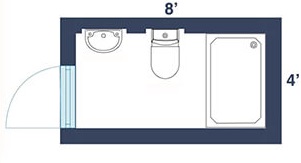
You just need to have the three basic fixtures, sink, toilet & shower.
- Layout: Organize the sink, toilet, and shower for practical use and easy access to utility lines.
- Measurements: Follow standard clearance requirements to ensure enough space around each fixture, typically 15 inches from the center of the toilet to any wall or other fixture.
Insulation
Adding insulation to the bathroom walls and ceiling will make it energy-efficient. Options like foam board or fiberglass will prevent dampness and keep the bathroom comfortable year-round.
Step 3: Researching Local Building Regulations
Adding a bathroom to a garage requires an understanding of local building laws and regulations. Building codes vary by location, so you need to check requirements specific to your area, especially for a detached garage bathroom.
Zoning and Code Requirements
- Permits: Most areas require permits for adding plumbing, electrical, and structural elements to a garage.
- Garage-Specific Codes: Regulations may differ for garages, particularly detached garages. Requirements like minimum ceiling height, waterproofing, and proper ventilation are common. Some codes may also dictate floor slope to allow proper drainage.
- Plumbing and Electrical Standards: Building codes generally require that bathrooms follow certain plumbing and electrical standards to ensure safety. This includes proper venting of pipes and using GFCI (Ground Fault Circuit Interrupter) outlets.
Step 4: Obtaining Permits for a Garage Bathroom Addition
Obtaining the right permits is essential before adding a bathroom to a garage. Permits ensure that your project meets all local building codes and safety standards, preventing potential fines and complications.
Incorporating Existing Utilities in Your Plan
Evaluating existing plumbing and electrical and incorporating them in the remodel will save you money and time.
Garage Plumbing Requirements
To evaluate plumbing needs:
- Check distance to main water and sewer lines.
- Assess the condition and capacity of current plumbing.
- Verify that pipes are appropriately sized for added water pressure.
- Ensure the sewer line can handle additional waste.
If inadequate, upgrades or replacements may be needed, along with consideration for a septic system.
Garage Electrical Requirements
To assess electrical needs:
- Confirm the system can handle increased power demand.
- Ensure sufficient amperage and voltage for lighting, ventilation, and appliances.
Upgrades or new circuits may be required if the system is insufficient.
Types of Permits Required
- Plumbing Permit: Adding a bathroom means you’ll need permits for plumbing work, as you will be connecting to the main water and sewer lines.
- Electrical Permit: If you’re installing lighting, outlets, or a water heater, an electrical permit is required. This ensures all wiring meets safety standards, particularly for wet areas.
- Structural Permit: Building new walls, adding insulation, and creating partitions generally require a structural permit, as it involves altering the layout and structure of the garage.
How to Apply for Permits
Visit your local building department to apply for the necessary permits. Prepare documents and detailed drawings showing your layout, plumbing plans, and electrical setup.
Review the fees associated with each permit, as they vary based on the project scope and location.
Working with Inspectors
During the project, you may need to schedule inspections to verify that the work aligns with approved plans. Inspections often occur at critical stages, such as after framing, rough-in plumbing, and before finishing.
Staying organized and prepared can make these inspections smoother and help you stay on track.
With the right permits in place, you’ll be ready to start building a compliant, safe garage bathroom that meets all legal standards.
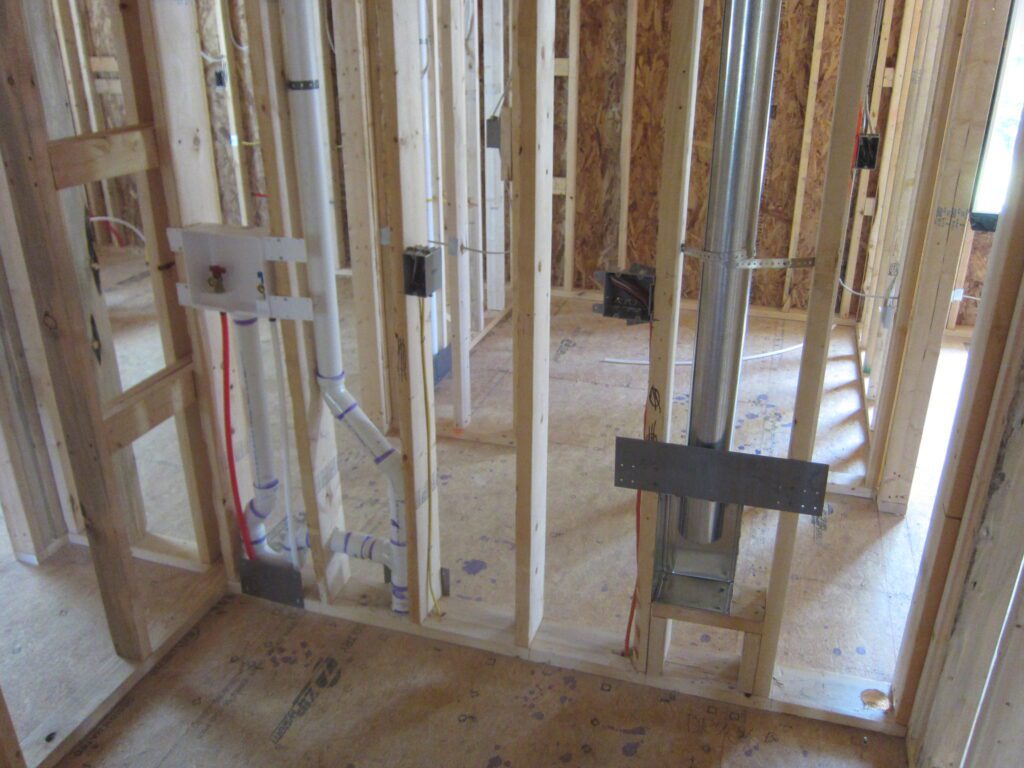
Step 5: Installing Key Utilities
With permits in place, it’s time to install the core utilities that will bring functionality to your garage bathroom. This includes plumbing, electrical wiring, and ventilation—all crucial for a comfortable, code-compliant bathroom in your garage.
A. Plumbing Installation
Plumbing is typically the most involved part of adding a bathroom to a garage, as it requires connecting to the main water and sewer lines. Here are key steps:
Connecting Water Lines:
For a detached garage, you’ll need an underground water supply line from the house to the garage. Start by identifying the shortest route, possibly connecting from an outdoor faucet or tapping into pipes in the basement, kitchen, or a nearby bathroom.
The pipe must be buried below the frost line to prevent freezing; if frost isn’t a concern, bury it 12–18 inches deep. The trench may need to cross the yard and driveway, and the pipe should enter through the garage foundation and slab.
TIP: PEX pipe is ideal for this job due to its flexibility and ease of installation, although PVC can also be used.
Installing Drains:
Proper drainage is essential, requiring connection to a sewer line or septic system. Septic options include:
- Traditional tanks: Affordable but need regular maintenance.
- Aerobic units: Costlier, more efficient, and lower-maintenance.
- Advanced systems: Most efficient and eco-friendly, but expensive.
To reduce digging, consider using an up-flush toilet system that pumps waste up to the sewer line, which can simplify installation in garages.
Can a Shower and Toilet Share the Same Drain?
Yes, the sink, shower, and toilet can share the same drain line, which connects to the city sewer system, but they must be connected in a specific order:
- Toilet: Connect first to the 4” main drain with a Y joint using a 3” pipe.
- Shower: Connect next with a Y joint and 2” pipe, adding a P-trap.
- Sink: Connect last using a 2” or 1 ½” pipe with another P-trap.
Attach the vent pipe here, which runs up to the roof to allow airflow, preventing a vacuum in the drain line.
Adding a Water Heater:
If the bathroom includes a shower, a small, tankless water heater can provide hot water without taking up much space. Place the heater close to the fixtures to minimize heat loss.
B. Electrical Wiring
Proper electrical wiring is mandated by code to ensure a safe and functional garage bathroom.
- Outlet and Light Placement: Position GFCI outlets near the sink and other wet areas to meet code requirements. Plan for additional outlets if you intend to add any appliances, such as a heater or dryer.
- Lighting: Consider moisture-resistant light fixtures, especially if there is a shower in the bathroom. Overhead lighting or wall sconces are ideal for clear, even illumination.
- Wiring for Ventilation: Adding an exhaust fan is essential for moisture control and mold prevention.
C. Ventilation
Adequate ventilation is critical to prevent mold and control humidity in your garage bathroom.
- Exhaust Fan: Install a bathroom exhaust fan with the right CFM (cubic feet per minute) capacity. Position it near the shower or toilet for optimal effectiveness.
- Ducting: Run the exhaust ductwork to the exterior of the garage, ensuring that it vents outside rather than into the attic or garage space to comply with code and prevent moisture buildup.
Step 6: Building the Bathroom Enclosure
With utilities installed, the next step is to build the bathroom enclosure. This includes framing the walls, installing the door, and adding insulation to ensure comfort, privacy, and temperature control.
A. Framing the Walls
You will need to build two partition walls, floor to ceiling. The shorter wall will have a door that opens outwards, to maximize the usable area of your small bathroom.
- Constructing Non-Load-Bearing Walls: Use 2×4 studs to frame non-load-bearing walls, which will separate the bathroom from the rest of the garage. Place studs 16 inches apart, securing them to the floor and ceiling.
- Securing the Structure: The frame will have a sole plate (to be secured to the concrete floor) and a top plate (to be attached to the ceiling or a beam).
- Partition Wall Placement: Position the walls to optimize the bathroom layout. Make sure to leave space for plumbing and electrical fixtures based on your layout plan.
B. Installing the Door
Of course, you need to install a door on the shorter wall of your garage bathroom:
- Door Type: Consider a compact door style like a sliding or pocket door if space is limited. For a more traditional look, a standard swing door can work well if there’s adequate space.
- Door Installation: Set the door frame in place, ensuring it’s level and plumb. Secure the door to the frame, then install the hinges and handle.
Step 7: Finishing the Bathroom Enclosure
With the walls framed, the next step is to finish your garage bathroom enclosure. This includes choosing durable flooring, applying moisture-resistant paint, and preparing the space for use.
A. Flooring
The bathroom in your garage is not too different from the bathroom in your home. You can cut out the luxury but not the basics. Selecting the right flooring will make your garage bathroom safe, water-resistant, and easy-to-clean.
- Water-Resistant Materials: Choose flooring that can handle moisture, like vinyl or ceramic tile. Vinyl is budget-friendly, easy to install, and highly resistant to water. You could go for ceramic tiles which add a durable, premium finish, if you do not mind the higher cost
- Sealing and Grouting: If you’re using tile, apply a waterproof grout sealer to protect against moisture.
B. Painting
Painting the walls and ceiling of your garage bathroom adds color and protects surfaces from moisture:
- Moisture-Resistant Paint: Use a mold- and mildew-resistant bathroom paint in a semi-gloss or satin finish for durability.
- Priming: Apply a primer before painting, if you’re working with new drywall. Priming ensures better paint adhesion and helps maintain color over time.
- Color Suggestions: Light colors like white, gray, or pale blue can make the space feel larger and brighter.
C. Final Touches and Preparation
With flooring and paint complete, the bathroom enclosure is almost ready. Here are a few final steps:
- Fixtures and Hardware: Install fixtures like the sink, toilet, showerhead, and any towel racks or shelves. Ensure that all plumbing fixtures are securely attached and fully operational.
- Caulking: Apply caulk around fixtures, tiles, and along the edges of the floor to prevent water from seeping into cracks or gaps.
- Ventilation Check: Test the exhaust fan to confirm that it effectively removes moisture and controls humidity, which is essential in a garage setting.
Step 8: Adding Personalization and Final Touches
With the basics in place, it’s time to add personal touches that make your garage bathroom feel like a true extension of your home. From functional accessories to décor, this final step helps you complete the space to suit your style and needs.
A. Practical Accessories
Consider practical additions that will make the bathroom more comfortable and functional:
- Storage Solutions: Add wall-mounted shelves, cabinets, or a vanity to store toiletries, towels, and cleaning supplies. A small utility sink cabinet can provide extra storage without taking up much room.
- Towel Racks and Hooks: Install towel racks or hooks to keep towels accessible and off the floor. Hooks are especially useful in small spaces, adding convenience without requiring much wall space.
- Mirror with Storage: A mirror with built-in storage (such as a medicine cabinet) can be both decorative and functional, offering storage for small items while adding depth to the room.
B. Décor and Comfort
Add a few decorative elements to give the bathroom a warm and welcoming feel:
- Rugs and Mats: Use water-resistant bath mats or rugs near the sink and shower for added comfort and to prevent slips. Choose materials that are easy to clean and mold-resistant.
- Artwork and Décor: Simple artwork, like framed prints or wall decals, can bring color and personality to the space. Just make sure any artwork is moisture-resistant.
- Lighting Fixtures: Swap out standard lighting for fixtures that fit your style. Choose moisture-resistant, bathroom-rated fixtures for safety and durability.
C. Smart Bathroom Features
For added convenience and functionality, consider integrating a few smart bathroom features:
- Motion-Sensor Lighting: Motion-sensor lights can be convenient, especially in a garage bathroom that may not be used frequently. These lights turn on automatically when someone enters and shut off after a set period.
- Heated Towel Rack: If you live in a colder climate, a heated towel rack adds a touch of luxury and keeps towels warm and dry.
- Exhaust Fan Timer: Installing a timer on your exhaust fan helps maintain air quality by running the fan automatically for a set period after each use.
A Few Recommended Products
Of course, you will choose products that best meet your needs, style, and budget, but here are a few suggestions that you may check out:
Sink, Toilet, Shower, and Water Heater
Recommended Product: KOHLER Verticyl 17″ Rectangular Undermount Bathroom Sink
Recommended Product: KOHLER Corbelle Comfort Height(R) Toilet
Recommended Product: DreamLine French Corner Sliding Shower Enclosure
Recommended Product: EcoSmart ECO 18 Electric Tankless Water Heater
Paints & Finishing
Rust-Oleum Painters Touch Gloss or Semi-Gloss, water-based acrylic formula, low odor, resists chips and provides long-lasting protection is a great choice.
Rust-Oleum Painters Touch Ultra Cover

Rust-Oleum Painters Touch Ultra Cover
Rust-Oleum Painter’s Touch Ultra Cover Multi-Purpose Brush-On Paint provides a smooth, durable finish that lasts longer than ordinary paints. Apply to wood, metal, plaster, masonry or unglazed ceramic. Durable formula resists chipping and fading.
What is the Cost of Adding a Bathroom to a Garage?
The cost of adding a bathroom to your detached garage will depend on factors
- Distance between House and Garage
- Size of the Bathroom
- Quality of Materials Used
The cost of the basic bathroom will be in the $3,000 to $6,000 range. However, the cost of plumbing could add significantly to the cost if the garage is more than 10-20 feet away.
There are just too many factors involved and only a local plumber will be able to give you an estimate after visiting the site and taking measurements.
FAQ
Do Bathrooms in Detached Garage Need Ventilation?
Every bathroom, whether it is in your house or in a detached garage, needs ventilation. High humidity and obnoxious odors go hand in hand with bathrooms.
Improper or inadequate bathroom ventilation will make your garage stink to high heaven. The high humidity will also result in damages to your car and other equipment & sporting goods stored in the garage.
How Do You Keep Pipes from Freezing in an Unheated Garage?
To prevent damage due to freezing of water pipes in an unheated garage use a combination of following techniques:
1) Use PEX piping; they expand when water freezes without bursting
Insulate water lines
2) Drain & shut off water lines
3) Keep the faucet dripping; flowing water reduces risk of freezing
What is the Code for Space Around the Toilet?
The National Kitchen & Bathroom Association (NKBA) recommends space requirements for the various items in a bathroom. Your local building authorities may have slightly different specifications. So you must check with them and ensure you comply with the local code.
NKBA recommends
Sink
Minimum of 30”X48” in front
Toilet
Minimum 24” in front. Minimum 15” from center of toilet to side walls. Minimum 30” center to center from any other sanitary fixture.
Shower
Shower area should be a minimum of 32”X32”. The total shower area for non-square showers, should not be less than 1,024 square inches. Minimum 24” clearance in front of shower entry.
Thank you very much for reading the post. I do hope you found it informative and useful.