Driveway Trench Drain Installation: 9-Step Ultimate Guide
As an Amazon Associate, I earn from qualifying purchases.
How Do You Do Driveway Trench Drain Installation?
Does water get into your garage through the garage door, when it rains hard? A Driveway Trench Drain Installation, in front of the garage door can trap and divert this water.
So, can the driveway trench drain installation be a DIY project?
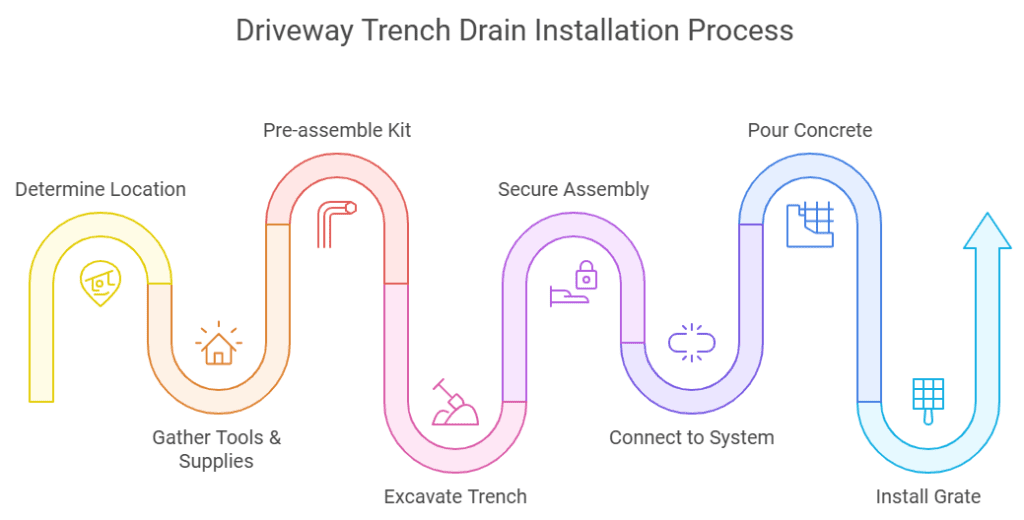
If you have some DIY skills, you can install a driveway trench drain yourself. Here is an easy-to-follow 9-step guide on how to do it.
Summary of the 9-Step Guide for Driveway Trench Drain Installation
| Step | Description |
|---|---|
| 1 | Determine the location of the driveway trench drain. |
| 2 | Gather all tools and supplies. |
| 3 | Pre-assemble the driveway trench drain kit. |
| 4 | Excavate and form the driveway trench. |
| 5 | Secure the trench drain assembly. |
| 6 | Connect the driveway drain to the stormwater system. |
| 7 | Pour concrete and finish the surface. |
| 8 | Install the grates over the trench drain channels. |
| 9 | Test the drain and clean up the worksite. |
Step 1 – Determine the Location of the Driveway Trench Drain
Determine the exact location where the Trench Drain will be installed. Does your garage have a concrete apron? Then the joint between the apron and the driveway is the ideal place.
If there is no apron then the joint between the garage floor slab and the driveway, just outside the garage door is the right place.
Before you start digging, do ensure that the chosen location does not have any existing electrical wiring, communication cables, gas pipes or plumbing (water supply, drains).
Step 2 – Gather all Tools & Supplies
Ensure that you have all the tools required. You will need
- Shovel & Pick for digging. You might need a Concrete Saw & a Trench Digger too
- Hack Saw, Utility Knife, Pliers & Tie Wire, Hammer & Nails for cutting and securing
- Measuring Tape, Permanent Marker, Masking Tape, Waterproof Silicone
Next, ensure that you have the right length and quantity of the supplies required
- Trench Drain Kit (Sections + End Caps)
- PVC Drain Pipe with Elbows
- Forming Lumber
- Concrete and Rebars
Step 3 – Pre-assemble the Driveway Trench Drain Kit
Pre-assemble your Trench Drain Kit and Drain Pipes (without applying the silicone at this stage) and lay them out at the installation location.
This way you are sure that all the measurements are correct. Cut and adjust lengths if required.
Step 4 – Excavate and Form the Driveway Trench
For Driveway Trench Drain Installation, you will need to cut a channel in the driveway in which to put in the “Forming”.
The form is to ensure that the Trench Drain is encapsulated in 4” of concrete all around. The concrete thickness will take the load of your cars.
The dimensions of the Forming should be
- Length – Trench Drain length + 4” on each end for the concrete
- Width – Trench Drain width + 4” on each side for the concrete
- Depth – Trench Drain height + 4” below the drain for the concrete
Prepare the Form as per the above dimensions using the lumber, and place it in the hole you just dug.
Dig out the trench for the drain pipe from the Trench Drain to the discharge point on the street. The drain pipe should slope at 1%, that is 1” of fall for every 8’ of the drain pipe.
Step 5 – Securing the Assembly
Snap the sections of the Trench Drain. Secure the end caps using silicone. Secure the PVC elbow and drain pipe using silicone.
Next place the complete assembly in the trench. The Trench Drain can be positioned in the desired spot either by suspending it or by supporting it on rebars.
TIP: Keep the top of the Trench Drain ⅛” – ¼” below the driveway and garage apron. This will reduce the impact on the Trench Drain when cars drive over it.
Step 6 – Connect the Driveway Drain to Stormwater Drainage System
Connect the driveway trench drain with the existing or newly designed stormwater drainage system.
This usually involves connecting the trench drain to a pipe that directs water away from the garage and driveway, ideally towards the stormwater drains.
You could also drain to daylight if you have the necessary space and permits.
Step 7 – Pouring Concrete & Finishing
Before pouring the concrete, cover the grates with masking tape. Now you are ready to pour the concrete.
Carefully pour concrete or polymer concrete around the trench drain channels and over the top of them to secure them in place.
Ensure proper compaction of the concrete to prevent settling and to provide a stable surface for the driveway.
After pouring the concrete, remove the masking tape and Finish the concrete so that it is level with the top of the Trench Drain.
Step 8 – Grate Installation
Place the grates over the trench drain channels. Choose grates that can handle the weight of vehicles and are visually appealing.
The grates should allow water to flow freely while preventing debris from clogging the drainage system.

Step 9 – Testing and Cleanup
Perform a water test to ensure that the trench drain is effectively collecting and draining water away from the garage and driveway.
Make any necessary adjustments to the system if required. Finally, clean up the worksite, removing any debris or excess materials.
Placement of a Driveway Trench Drain
By code, the concrete garage slab should slope towards the garage door. If the driveway is sloping towards the garage door too, then the point where the garage concrete apron meets the driveway is the lowest.
This meeting point between the garage concrete apron and the driveway is the best place for a Driveway Trench Drain Installation.
A Driveway Trench Drain runs parallel to the garage door and across the driveway. The Driveway Trench Drain, also known as a driveway channel drain, has grates on top to collect the rainwater flowing down, towards it.
The water drops into a channel with a U-shaped cross-section. The collected water is diverted away from the front of the garage using drain pipes.
A trench drain at the point where the driveway and the garage floor or the garage apron meet is quite often the lowest point. This is close to or at the exact location of the garage door. The garage floor usually slopes towards the garage door as per code and the driveway could be sloping towards the garage.
What is a Trench Drain System?
So what exactly is a Trench Drain System? You have seen gutters on roof edges. They are used to collect the rainwater falling on the roof and direct it towards the downspout and ultimately to the stormwater drain on the street.
A Trench Drain is essentially a gutter that is buried in the ground. It is used to collect the rainwater falling on the driveway or any impervious surface and direct it towards the stormwater drain on the street.
Typically, Trench Drains need to be installed in areas with vehicular or foot traffic, such as driveways, parking lots, patios, etc. Trench Drains will also have a grate on top to stop leaves and other debris from getting in and clogging them.
You may be wondering if French Drains and Trench Drains are the same thing. They are similar but not the same. French Drains should not be confused with Trench Drains. They may seem to be doing the same thing but there are subtle differences.
French Drain vs Trench Drain
A French Drain, like a Trench Drain, is also buried in the ground.
A French Drain collects underground or subsoil water. The objective is to prevent the subsoil water from leaking through the building foundation when the water table rises.
A French Drain is a type of Weeping Tile Drain, but on the building exterior. It is usually a perimeter drain so that it can prevent water seepage in the foundation all around.
A Trench Drain collects surface water from rain or snowmelt. A Trench Drain is installed to prevent certain areas from getting flooded. A Trench Drain is generally installed across a sloping surface such as a driveway or yard.
The top of a French Drain is below ground level but the top of a Trench Drain is at ground level.
A Trench Drain is also called a Channel Drain. The channel, however, should refer only to the U-shaped linear trough. The complete assembly of the channel, grates, endcaps, end outlets, catch basins and the concrete holding all of these is the Trench Drain System.
How To Select the Right Driveway Trench Drain?
Before you start your Driveway Trench Drain Installation, you have to select the driveway drain system that will be right for your needs. To do this you must consider the following factors:
How do you Size a Driveway Trench Drain?
Sizing a Driveway Trench Drain is the process of determining the channel dimensions that will get the job done.
LENGTH: The total length of the channel should be around the same as the garage door width. It could be shorter or longer than the driveway width, but not by too much. Channel sections come in around 39″ (1 meter) standard lengths. Several sections can be snapped together to give the required length.
WIDTH: Channels come in standard widths. The channel width can range from 1” (for a microchannel or slot drain) to 12”. The size that is best for you will depend on the maximum amount of water flow that you are expecting.
DEPTH: The depth of the channel is related to the width and the maximum amount of water flow that you are expecting.
How do you Calculate the Drain Flow Rate?
The required trench drain flow rate (in gallons per minute) depends on:
- Driveway Area (in square feet)
- Rainfall Rate (in inches per hour)
- Surface Type (Asphalt & Concrete Driveway have 100% runoff)
- The driveway slope, towards the garage
There are online calculators to make your job easier. You can try out https://www.ndspro.com/tools-and-calculators/ez-drain-calculator
What are Driveway Trench Drains Made of?
A variety of materials can be used to make the channel and other fittings of a Driveway Trench Drain System. The choice of material often depends on the Trench Drain capacity and the traffic load on it.
Generally speaking
- Small capacity Trench Drains designed for light loads such as foot traffic are made from PVC
- Medium-capacity Trench Drains designed for medium loads such as passenger cars are usually made from Polypropylene. Other materials such as stainless steel, cast iron, etc. may also be used
- Large-capacity Trench Drains designed for heavy loads such as trucks or camper vans are likely to use fiber-reinforced concrete
Most manufacturers offer online Channel Drain Selectors. Check out https://www.ndspro.com/choose-the-right-channel-drain.html for example.
Do Driveway Trench Drains need to be Sloped?
Driveway Trench Drains come either with a 0.5% slope or a neutral slope. A slope of 0.5% translates to a drop of 1” for a 16’ Trench Drain.
Driveway Trench Drain Installation does not require the Trench Drain to have a slope as the length is relatively short. A Trench Drain with a neutral slope is a lot easier to assemble.
You should, of course, provide a slope of 1% in the drain pipe that will carry the water from the Trench Drain to the discharge point on the street. If the street is 100 feet away from the garage then the drain pipe will need to drop by 1 foot.
Recommended Driveway Trench Drain Kit
I recommend using the following products that can be ordered from Amazon using the links below:
NDS Channel Drain Kit

Key Features:
- The 5 in. Pro Series Channel Drain Kit with Deep Profile Channel is ideal for draining moderate flows from hardscape surfaces such as driveways
- Channel sections connect with interlocking joints. Connect 5 sections for a total length of over 16′
- Handles 72 GPM per ft. flow rate. 23.5 sq. in. per linear ft. open surface area.
- Rated for NDS Class B Loads (up to 175 psi) when properly installed—recommended for medium-duty pneumatic tire traffic, autos, and light trucks at speeds less than 20 mph
- ADA compliant
Beyond Driveway Trench Drains
Trench drains or channel drains find many applications around the house. As such, you may find the information in the next few sections quite useful.
Types of Trench Drain Installations
Trench drains are versatile drainage solutions, used in residential, commercial, and even industrial settings to control water flow and prevent flooding.
Although commonly seen in driveways, trench drains can also be used for water management in areas beyond driveways, including patios, walkways, and pool decks.
Trench Drains for Residential Spaces
Trench drains direct rainwater away from permeable surfaces like garden paths, patios, and landscape borders. Installing a trench drain along a patio or walkway can prevent water from pooling.
Pool Decks and High-Moisture Areas
Trench drains are ideal for managing overflow water on pool decks and similar high-moisture areas.
Poolside trench drains divert the water, prevent it from spilling into nearby yards or walkways, and reduce soil erosion and water wastage.
Commercial and High-Traffic Applications
Beyond residential use, trench drains are essential in commercial settings like parking lots, public walkways, and loading areas.
In these high-traffic areas, robust trench drain systems with durable materials and heavy-duty grates are usually required to handle the weight of trucks and heavy vehicles.
Customizing Trench Drains for Each Setting
Selecting the appropriate trench drain for each area—whether a driveway, walkway, or pool deck—can significantly improve drainage efficiency and reduce maintenance needs.
By investing in customized drainage solutions, homeowners and builders can better control water flow, protect landscapes, and ensure safer, drier outdoor spaces.
Choosing the Right Trench Drain for Your Project
Choosing a trench drain that fits your project’s demands involves considering load class, materials, grate style, and budget.
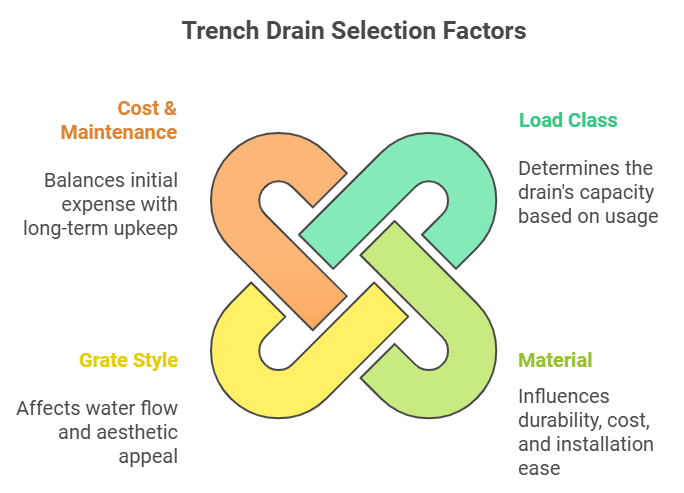
Each factor ensures the drain meets functional needs while staying within budget.
Load Class
The load class determines a drain’s weight-bearing capacity. A medium-load class drain system can support cars and light trucks and is adequate for residences.
However, commercial settings like parking lots require a higher load class to handle heavier vehicles and traffic.
Material Selection
Material affects a trench drain’s durability, cost, and ease of installation.
Concrete is highly durable and suited for heavy-duty areas, while plastic offers a lightweight, budget-friendly option for DIY residential installs.
Metal options, such as stainless steel, resist corrosion and are ideal for long-lasting performance in high-traffic areas.
Choosing the right material helps maintain efficient stormwater management and yard drainage.
Grate Style
Grate styles, from slotted to perforated, impact drainage efficiency and appearance.
Slotted grates are effective for driveways with high water flow, while decorative grates suit patios or pool decks where style matters.
Picking the right grate style enhances surface drainage and complements the landscape.
Cost and Maintenance
Balancing initial cost and maintenance needs is important. Plastic drains are cost-effective but prone to cracking under heavy loads. Concrete and metal options, though pricier, often require less maintenance.
Investing in the right trench drain system helps avoid future repair costs and improves surface drainage over time.
Local Regulations and Permits
Before installing any trench drain, you need a permit from the local authorities. You or your contractor must have a good understanding of the local regulations.
Local building codes govern drainage projects to ensure safe stormwater management and protect groundwater.
Permit Requirements for Trench Drains
Permit needs vary by location and project type, particularly for larger installations or those affecting public spaces.
Driveways, for example, need a permit to connect to the main stormwater drainage system, while commercial projects often have stricter requirements.
Environmental Considerations
Trench drains impact water flow and erosion control, and poor planning can lead to issues like flooding or unintended water diversion.
Local regulations help ensure your system supports sustainable surface drainage while preventing water pooling or overflow issues in neighboring areas.
Securing the right permits and adhering to local codes protect your property and the broader environment, ensuring a responsible and effective drainage solution.
Troubleshooting Common Trench Drain Problems
Even a well-installed trench drain can develop issues over time. Here’s a quick guide to diagnosing and addressing common trench drain problems.
Clogging and Debris Accumulation
Trench drains can become clogged with debris, block water flow, and cause water pooling or flooding. Regular cleaning, or installing debris filters, can help prevent clogs and ensure reliable yard drainage.
Improper Slope
If the trench drain isn’t sloped correctly, water may stagnate. Signs include slow drainage or standing water near the drain. Adjusting the slope, often with professional help, can resolve this issue and restore proper flow.
Cracked Concrete and Structural Damage
Concrete around the drain may crack due to freeze-thaw cycles or heavy loads. Sealing cracks quickly prevents further damage and avoids costly repairs.
Loose or Broken Grates
Over time, grates may loosen or break, particularly in high-traffic areas. Re-securing them or opting for durable grate materials can prevent this issue and keep the drain functioning optimally.
Proactively addressing these common issues can extend your trench drain’s lifespan and improve overall drainage solutions efficiency.
Thank you very much for reading the post. I do hope you found it informative and useful.