How to Waterproof Garage Walls? (A 6 Step Way That Will Help!)
As an Amazon Associate, I earn from qualifying purchases.
How to Waterproof Garage Walls?
It has been raining the whole night. The ground around your house is soggy. If this was not enough to dampen your spirits, you walk into your garage to find that water has been leaking into the garage under the wall. Looks like you must waterproof your garage walls. But how to waterproof garage walls?
Waterproofing of walls is an essential part of house construction. But you can not go back in time. So you have to do the best you can now.
The best way to waterproof your garage walls now is to go about it in a methodical, step by step process as under:
- Locate the source of water leakage
- Dig a trench to expose the foundation wall & part of the footing
- Wash away all the mud & soil from the exposed surface
- Fill up the cracks & holes with sealant. Waterproof using Liquid Rubber
- Install a Trench Drain or French Drain
- Connect the French drain to storm water drain
There are no shortcuts when you need to waterproof your garage walls. You have to get your hands dirty and do a thorough job. That is the only way to ensure that your garage walls are dry after the next heavy downpour.
Waterproofing at Construction Stage
Of course the best time to take care of waterproofing of the house foundation is at the time of construction. This ensures the job is thorough and it actually works out cheaper in the long run. Waterproofing using retention walls is critical when building a house or garage on a steep slope.
Even though you are beyond the construction stage, at this point, you should know how waterproof of garage walls or rather the entire house foundation is done at construction stage. This knowledge will come in handy as:
- You or a close family member may construct a new house in the future.
- You will still be applying many of the principles of how to waterproof your garage walls, right away.
Damp Proof vs Waterproof
The minimum requirement of the building code is that a house should be “damp proof” at the time of construction. And this is what many builders will do. Just meet the minimum requirement.
Homeowners often assume that “damp proof” and “waterproof” are one and the same thing. They most certainly are not.
US Waterproofing explains the difference as under:
“Damp proofing resists the passage of water in the absence of hydrostatic pressure; waterproofing stops the passage of water under pressure”.
Source: uswaterproofing
The soil around the foundation of your house always has some moisture in it. However, this level of moisture is in equilibrium and does not create any pressure on the foundation.
So “damp proofing” of the foundation is sufficient to prevent the moisture in the soil from entering the concrete and making its way into the basement, garage or other rooms of the house.
However, the moisture level in the surrounding soil can rise significantly as a result of heavy rains & poor drainage. Then the water starts exerting “hydrostatic pressure” on the foundation concrete.
Just “damp proofing” can not resist this water pressure. Water will seep in, into the interior of the house through the pores (capillaries) in the concrete or even cracks & holes that develop over time.
STEP 1: Locating The Source
The Source of Water Leaking into the Garage under the Wall is most definitely the high hydrostatic pressure from the water in the soil around the leakage area.
A combination of a heavy downpour and a breakdown in the perimeter drainage system is causing this water logging. Sometimes it may not even be rain but an overflow or leakage from another source such as a water tank or a pond.
Check if the water is leaking into other rooms as well. Especially check the basement. If so then the reason is most likely that the foundations of your house were only “damp proofed” not “waterproofed”.
If there is leakage in your basement then that’s a huge problem and you will need to get basement experts to take a look and sort it out. Anyway, that is not the subject of this blog post.
However, if the water is leaking only under the garage wall, then the problem is localized. The house foundations are waterproofed, but either the waterproofing or the perimeter drainage system has been damaged.
Whatever the reason, you have a problem on your hands. And you gotta fix it!
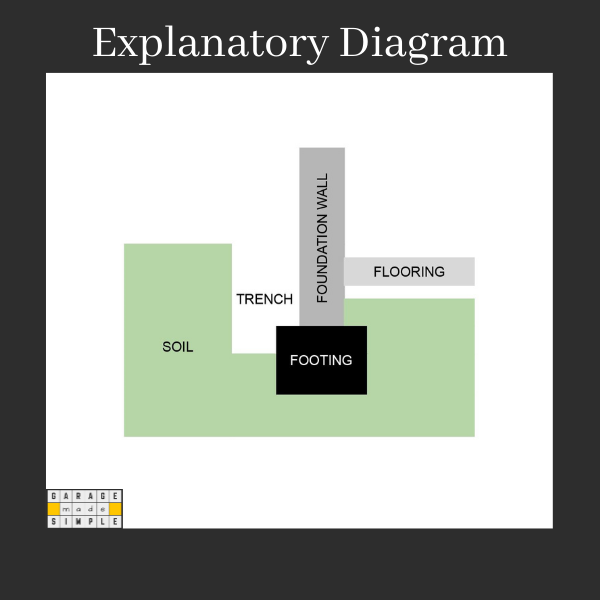
STEP 2: Digging a Trench
Clearly the problem is in the exterior of the house. And you have to correct it there. Every house sits on a foundation and the foundation sits on a footing.
So you have to start off by digging the soil next to the foundation in the leakage zone. Basically dig a trench that exposes the entire foundation and a few inches of the footing.
If the house has an existing French Drain System, then you have to expose that. The French Drain needs to be inspected for blockage, breakage or leaks etc.
If there was no French Drain System then the trench has to be wide enough to accommodate a new French Drain System.
Footing drains, perimeter drains, drain tile and French drains are all names for the drainage system that surrounds your home’s foundation.
Source: JES Foundation Repair
But more on this later.
STEP 3: Pressure Washing
Once the foundation wall and a part of the footing has been exposed, you need to use a pressure wash to thoroughly clean the exposed surface.
Make sure that all the mud gets washed away, especially mud at the joint of the foundation wall and the footer. This may reveal gaps, cracks or holes at the joint or even in the foundation wall above the joint.
When there is too much water in the soil, in other words there is hydrostatic pressure, the water gets pushed into your garage. In any case, the foundation wall, masonry or concrete, is porous. So water moves up in the wall by capillary action (aka wicking).
STEP 4: Waterproof the Garage Wall
Use a blower to dry as well as blow away any remaining mud & dust particles still lodged at the joint of the foundation wall and footer.
The gaps, larger cracks & holes at the joint need to be sealed with a cementitious water plug such as Sakrete | Hydraulic Cement Leak Stopper – Gray | 10 lb available at Amazon.
The Cracks in the foundation wall should be sealed with polyurethane, silicone or acrylic sealant. The Masonry & Concrete Polyurethane Sealant from Red Devil is one of the best and is available on Amazon.
Finally, the entire foundation wall from say 6 – 12 inches above the soil level to the bottom of the exposed footer level should be coated liberally with Liquid Rubber Foundation and Basement Sealant.
Liquid Rubber Concrete Foundation and Basement Sealant

Liquid Rubber Concrete Foundation and Basement Sealant
- PROTECTIVE FINISH FOR – Foundations, ICF’s, Basements, etc.
- HIGHLY FLEXIBLE – Sealant final membrane has over 900% elongation
- EASY TO APPLY – No mixing required!
- ENVIRONMENTALLY FRIENDLY – water based, containing no solvents, VOC’s or harmful odors.
- FOR A BULLETPROOF SYSTEM – Bridge joints, seams, vents, gaps, protrusions….
STEP 5: Laying the French drain
The perimeter drain or French drain runs around the garage or the house and is level all around. Its job is to collect all the rain water and keep it at a level below the foundation wall and footer joint.
The way it does this is by using a perforated pipe drain in the perimeter trench. You must follow the following steps.
- Lay filter fabric in the drain with enough extra on both sides.
- Place 2 – 3 inches of gravel on the filter fabric, all around.
- Lay the pipe drain on the gravel.
- Ensure the perforated holes are pointing downwards.
- Cover the drain pipe with more gravel.
- Cover the gravel with the extra filter fabric.
- You must make sure (and this is critical) that the top of the drain pipe is below the top of the foundation wall and footer joint.
If done correctly, the rain water will quickly flow through the top soil and the gravel into the perforated drain pipe.
STEP 6: Connecting to Storm Water Drain
The last step is to connect the French drain to either the Storm Water drain or some other point where the water can be absorbed in the soil without creating any hydrostatic pressure on the house or garage walls.
To do this you need to dig a long deep trench that slopes down gradually from the perimeter drain to the storm water drain. You need to connect a pipe and run it down this trench.
The idea is to use gravity to move the water from the French drain to the storm water drain. Finally you can backfill all the trenches that were dug up.
The EZ-Drain option
Home Depot carries an advanced version of the drain pipe that lets you eliminate the laying of the filter fabric and the gravel. It is called the EZ-Drain Prefabricated French Drain with Pipe.
This system uses a corrugated pipe surrounded by polystyrene aggregate that is then wrapped in filter fabric. EZ-Drain captures and redirects groundwater around house and yard and is easy to install saving labor by 50%.
Thank you very much for reading the post. I do hope you found it informative and useful.