How To Waterproof a Garage Floor? 5 Step Simple Guide!
As an Amazon Associate, I earn from qualifying purchases.
How Do You Make a Concrete Garage Watertight?
Do you find water pools on your garage floor during heavy rainfall? This would not be an issue if you knew how to waterproof a garage floor.
You might think that a little water will not cause any serious damage to the concrete garage floor. Though concrete is strong, water can penetrate unprotected concrete and degrade it quite rapidly. So how do you make a concrete garage watertight?
To make a concrete garage watertight you must waterproof the concrete garage floor by coating it with a liquid rubber waterproofing membrane. Liquid Rubber is a water-based, easy-to-apply coating system that forms a completely waterproof membrane on the floor after drying.
Liquid Rubber Sealant is a highly flexible, UV-stable, one-pack product. The final membrane has over 1000% elongation and the sun will not degrade it. The sealant gets into every crack in the concrete floor to form a seamless membrane that is 100% waterproof.
However, Liquid Rubber can not be the final coat on a garage floor, because it is:
- Flexible & soft
- Not compatible with mineral spirits & solvents
Liquid Rubber can be coated with a water-based latex/acrylic or 1-part epoxy floor paint. Alternatively, you could place mats or tiles on top.
When Should You Use Waterproofing?
A concrete garage floor is essentially a “slab on grade”. The floor therefore requires waterproofing from groundwater that can rise up due to hydrostatic pressure, water vapor gradient, or capillary action.
The floor also needs to be waterproofed from above to prevent the penetration of water from rain, snow melt, or plumbing leaks. Water can infiltrate the concrete floor through cracks, structural defects, or defective joints.

You need to waterproof your concrete garage floor in three stages:
- During the construction of a new garage
- Just after the concrete floor has cured
- Regular maintenance waterproofing
During the Construction of a New Garage
The most cost-effective time to waterproof the garage concrete floor is at the construction stage. A vapor barrier (aka moisture barrier) needs to be laid out on the compacted base, prior to placing the concrete mix.
A vapor barrier is a material that prevents the movement of vapor or moisture from an area of concentration to a livable area.
For maximum effectiveness, the vapor barrier should be in direct contact with the underside of the concrete slab. This means that the vapor barrier should be laid out after all the ground preparation has been completed.
Just After the Concrete Floor Has Cured
Curing is a hydration process, during which the cement reacts with the water to form crystals. The crystals grow into a matrix enveloping the sand and other aggregates in a tight mesh.
The curing process takes 4 weeks to complete. Once curing is complete, the concrete becomes hard & strong.
The excess water migrates to the surface and evaporates, during the curing process. This creates capillaries in the concrete slab, which need to be sealed to waterproof the garage floor.
There are Penetrating Concrete Sealers and Topical Concrete Sealers. A Penetrating Concrete Sealer penetrates the tiny concrete pores, fills them up, solidifies, and blocks them. They do not form any film on the surface.
Silanes make the best penetrating concrete sealers because:
Due to their small molecule size, Silanes are frequently used for sealing pre-cast concrete and high performance concrete such as: parking garages, bridge decks, building facades, and concrete forms.
ConcreteSealersUSA
I recommend using Foundation Armor SX5000 Water Based Silane Siloxane Penetrating Concrete Sealer.
The Armor SX5000 WB is a water-based Department of Transportation (DOT) approved Silane-Siloxane penetrating concrete sealer. It penetrates deep into the substrate where it chemically reacts to form a hydrophobic barrier within the pores
This reduces the absorption of water by up to 95%. It protects concrete, from within, without changing the look or feel of the surface.
- Zero VOC, Water Based Sealer for Unsealed and Uncolored Smooth Troweled Concrete
- Restricts Moisture Absorption, Imparts Water Repellency
- Combats Freeze/ Thaw, Reduces Scaling & Spalling
- Resists Salts & Deicing Chemicals, Decreases Efflorescence
- Limits Dirt Buildup, Retards Organic Growth, Makes Easier to Clean
Regular Maintenance Waterproofing
Every now and then you need to apply a coat of topical waterproofing primer & paint system on the concrete garage floor to protect it from water infiltration through cracks, structural damages, and expanded joints.
The coating applied should be able to penetrate & bond with the cracks & joints. At the same time, it needs to be flexible, so that it does not crack when the concrete cracks move or expand.
Note: Epoxy, a preferred garage floor coating is hard but brittle. It tends to mirror the cracks in the concrete floor.
Liquid Rubber Coating is not hard but flexible. It will seal any cracks in the concrete. It is excellent for waterproofing porous materials such as concrete.
How to Waterproof a Garage Floor?
To waterproof a garage floor you need to follow these 5 simple steps:
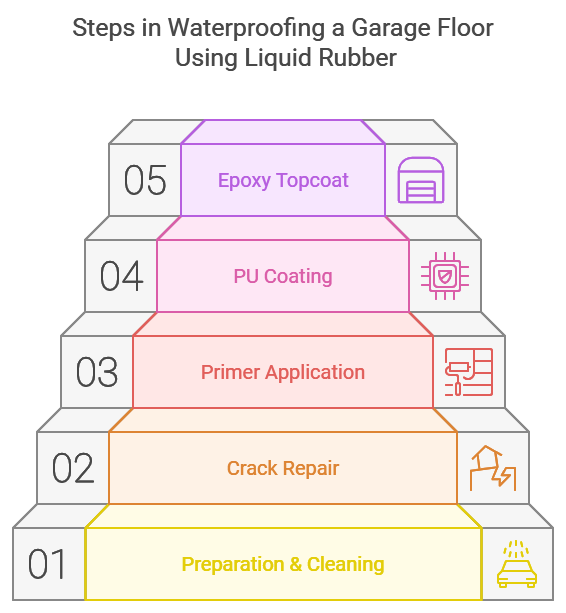
STEP 1: Preparation & Cleaning
Start off by removing all items that are on the garage floor. This includes the vehicles, workbenches, storage racks, tiles & mats, etc. Every square inch of the garage floor should be visible and accessible.
Clean the garage floor using a broom, or better still a vacuum cleaner. Wash the floor with soap and water. You can use a pressure washer, but make sure to set it on a low-pressure setting.
Pay special attention to removing oil & grease marks, by using a “degreaser”. You also need to etch new or bare concrete with muriatic acid to ensure the concrete has a grip and the Liquid Rubber Primer will have good adhesion.
Alternatively, you can use Rust-Oleum Quick Prep 3-in-1 Cleaner Degreaser and Etch.
Scrape off any loose or flaking paint from the previous application using a wire brush or coarse sandpaper.
STEP 2: Floor Inspection & Crack Repair
Now it is time to inspect the state of the garage floor. You will certainly see cracks in the concrete. Hairline cracks do not matter, but cracks that are wider than ⅛” will need to be filled up.
This is also a good time to fill up dents & low spots and correct any slope-related issues.
Remove any remaining dust on the garage floor using a dry or wet mop. The concrete should be completely dry before the Liquid Rubber application. You can check the moisture content in the concrete floor by taping a 1 ½’ square of plastic to the floor and leaving it overnight.
STEP 3: Liquid Rubber Primer Application
For best results and to ensure that your garage is watertight, waterproof the bottom 6″ of the garage wall along with the floor. Mark off the 6″ line using masking tape.
Use a brush or roller to apply a coat or two of Liquid Rubber Multi-Purpose Primer on the bottom 6″ of the wall, the wall-floor joint, and the floor. The recommended coating thickness of the Multi-Purpose Primer is between 4-5 mils DFT with a spread rate of 200-250 square feet per gallon.
Liquid Rubber Multi-Purpose Primer is a single-component epoxy composition, suitable for easy and safe application. The primer will minimize vapor drive and maximize the adhesion of the waterproof membrane. Liquid Rubber Multi-Purpose Primer is freeze/thaw stable and fast drying.
Liquid Rubber Multi-Purpose Primer

Liquid Rubber Multi-Purpose Primer
Liquid Rubber Multi-Purpose Primer enhances adhesion and prevents blistering on surfaces like concrete and wood.
It’s easy to apply by brush, roller, or spray and dries quickly. Water-based and eco-friendly, it’s safe for people and pets. Apply on a clean, dry surface.
STEP 4: Liquid Rubber PU Coating Application
Apply 3-4 thick coats of Liquid Rubber Smooth Polyurethane Deck Coating on top of the primer, once dry. You can use a brush, ⅜” nap roller, or hopper style sprayer.
Liquid Rubber Polyurethane Deck Coating is a high-performance polyurethane coating with a hard, durable & waterproof surface with excellent UV stability. It comes in two finishes, smooth & textured, and a small range of 10 select colors.
Use 1 Gallon of coating for every 40 square feet of floor area. You need to build up a high film thickness for best results.
Liquid Rubber Smooth Polyurethane Deck Coating

Liquid Rubber Smooth Polyurethane Deck Coating
Liquid Rubber Polyurethane Deck Coating offers durable, waterproof, and UV-stable protection for decks, pool areas, and walkways.
It’s easy to apply with a brush or roller, covering 50 sq. ft. per gallon (or 30 sq. ft. in high-traffic areas) with 3-5 coats.
STEP 5: Epoxy Shield Topcoat Application
Apply one coat of Rustoleum Epoxy Shield Concrete Floor Paint using a ⅜” nap roller. This one-part epoxy paint is self-priming and requires only one coat. The modified acrylic water-based paint resists fading, chipping, and stains, even when exposed to sunlight, weather, hot tires, or chemicals.
Rustoleum Epoxy Shield Concrete Floor Paint
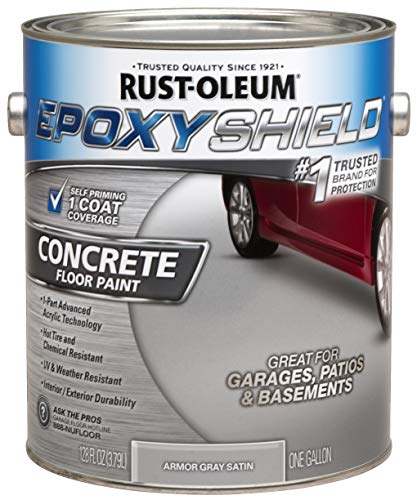
Rustoleum Epoxy Shield Concrete Floor Paint
Epoxy Shield Armor Concrete Floor Paint, made in the U.S., offers an elegant design and smooth finish with advanced acrylic technology.
It’s durable for both indoor and outdoor use and allows easy soap and water cleanup.
It is optional, but you can apply a coat or two of water-based, hard-wearing clear coat for added protection and aesthetic appeal. To ensure the topcoat is not too slippery add some Rustoleum Anti Skid Additive to it.
All that is left now is to wait for a day or two and move your stuff back into the garage!
Types of Garage Floor Waterproofing Materials
Liquid Rubber is among the best, if not the best option, to waterproof a concrete garage floor. No wonder, I have devoted most of this article to it.
However, for an impartial report, I must write about the other options too. Selecting the right waterproofing material can increase the durability, moisture resistance, and overall longevity of the garage floor.
While liquid rubber is one popular choice, there are other waterproofing materials to consider, as well. Here are the top contenders:
Epoxy Coatings
Epoxy coating is a robust option for garage floors that undergo heavy use or frequent exposure to chemicals. Once cured, epoxy forms a hard, durable surface that resists water, oil, and chemical spills.
In addition to its waterproofing properties, epoxy enhances the floor’s aesthetic appeal, with a polished, professional finish.
Polyurethane Coatings
Polyurethane coatings are a flexible yet resilient layer and can handle temperature fluctuations well. This makes them suitable for garages in regions with variable weather.
Polyurethane is more resistant to UV light, which prevents yellowing and degradation if the garage receives natural light. This waterproofing material creates a lasting, smooth finish and has moisture-resistant properties.
Asphalt-Based Sealants
For cost-effective, durable waterproofing, asphalt-based sealants are another option. These are especially beneficial in garages prone to hydrostatic pressure or groundwater seepage.
Asphalt-based sealants form a moisture barrier that resists water penetration, making them an acceptable choice for garages in regions with heavy rainfall or high humidity.
Vinyl Membranes
Waterproofing membranes, like vinyl, are highly durable. They can prevent underground moisture from rising up from below the concrete floor surface.
Waterproofing membranes are an effective solution for garages in areas with high groundwater levels. Vinyl membranes act as a strong vapor barrier, preventing water from seeping through concrete due to capillary action.
Waterproofing Paints
For a simple, budget-friendly solution, waterproofing paints can be applied to the garage floor to form a basic layer of protection against moisture.
Though less durable than other materials, they’re easy to apply and maintain, making them ideal for minor waterproofing needs in low-traffic garages.
Silicones
Silicone-based waterproofing solutions are versatile, and commonly used for sealing minor cracks or leaks around the garage edges. They’re easy to apply and provide reliable waterproofing in small areas, serving as an effective crack repair solution to maintain a secure moisture barrier.
Choosing the Right Waterproofing Material for Your Garage
Selecting the right waterproofing material for your garage floor is an important decision for maximizing durability and water resistance.
With various materials available, the best choice often depends on factors like climate, budget, intended garage use, and the floor’s condition.
Here’s a guide to help you determine the ideal moisture barrier solution for your garage.
Climate
Climate significantly impacts the type of waterproofing you need.
In colder regions where freeze-thaw cycles are common, a flexible material, like Liquid Rubber, Membrane, or polyurethane coating, is advisable.
A UV-resistant coating such as polyurethane is beneficial, for warmer climates with high sun exposure, as it resists yellowing and degradation over time.
Meanwhile, areas with frequent rainfall will benefit from a vinyl membrane or an asphalt-based sealant to protect against groundwater and hydrostatic pressure.
Budget
Your budget will, of course, dictate the type of waterproofing solution you choose.
Waterproofing paints and asphalt-based sealants are low-priced. They provide basic protection and a moisture barrier.
Epoxy or polyurethane coatings are expensive but they offer better protection and longer lifespans. While epoxy coatings can be more expensive initially, their resistance to chemicals and heavy traffic are useful features for a garage.
Intended Use of the Garage
How you plan to use your garage can also influence your choice.
A durable and hard-wearing option like epoxy is recommended for garages that double as workshops or storage areas for heavy equipment. Its resistance to abrasions, chemicals, and heavy loads makes it ideal for high-traffic areas.
If the garage is simply used for parking, a waterproofing paint or asphalt-based sealant can be sufficient for protecting against everyday moisture and spills.
Existing Floor Condition
The current condition of your garage floor is another critical factor to consider in your final choice.
Floors with cracks or uneven surfaces will need additional surface preparation before waterproofing. Filling cracks with a concrete sealer or silicone will ensure better adhesion of the waterproofing material.
Older floors with substantial damage may benefit from a vinyl membrane, as it can handle high water pressure and provide comprehensive moisture resistance.
Choosing the right waterproofing material can enhance your garage’s durability and protect it from water damage over time. Create a reliable, long-lasting solution for a watertight garage floor with the right waterproofing material choice.
Maintaining a Waterproofed Garage Floor
Once your garage floor is properly waterproofed, maintaining it is essential to ensure longevity and continuous protection against moisture. Regular upkeep can prevent water damage, preserve the coating’s effectiveness, and save on future repair costs.
Here are some key maintenance tips to keep your garage floor in excellent shape.
Regular Cleaning and Inspection
Dirt, oil, and chemicals that accumulate on the garage floor can gradually break down the waterproofing layer.
To avoid this, sweep and mop the floor regularly using a gentle, non-abrasive cleaner. Avoid harsh chemicals, which may damage certain coatings, like epoxy or polyurethane.
Regular cleaning also makes it easier to spot any developing issues, like minor cracks or wear in the coating.
Perform a thorough inspection every few months, checking for signs of capillary action (moisture rising from the ground) or surface deterioration.
Addressing Minor Cracks and Leaks
Even with waterproofing, Concrete garage floors can develop small cracks over time due to natural settling or vehicle weight. Addressing these early can prevent moisture from seeping through the concrete slab.
Use a concrete sealer or silicone-based repair product to fill and seal small cracks. It will keep moisture out, protect against hydrostatic pressure, and maintain a continuous moisture barrier.
Re-Application of Sealant When Necessary
Over time, even high-quality waterproofing solutions may start to wear down, especially in high-traffic areas or garages exposed to frequent water exposure.
Depending on the type of waterproofing material used, reapplication every few years may be necessary.
Epoxy coatings and polyurethane finishes, generally last longer but will eventually require a topcoat to refresh their vapor barrier capabilities.
If you notice visible thinning, peeling or reduced waterproofing performance, reapply a compatible sealant to restore the durability of your floor.
Preventing Damage from Vehicles
Car tires bring in water, salt, dirt, and even small pebbles, which gradually wear down your garage’s waterproofing layer.
During winter, placing mats under vehicle tires can reduce water and salt exposure to the floor, helping prevent corrosion and protect the coating.
Be mindful of sharp tools or equipment that could scratch or damage the waterproofed concrete garage floor.
With regular care, a quality waterproofing system can provide years of reliable moisture resistance and ensure a durable, watertight garage floor.
Thank you very much for reading the post. I do hope you found it informative and useful.