Putting Drain in Existing Garage Floor in 5 Easy Steps!
As an Amazon Associate, I earn from qualifying purchases.
Can You Add a Drain to a Garage?
It can be frustrating to see a pool of water on your garage floor after you are done washing your car. It is a safety hazard too as wet surfaces are slippery. So can you add a drain to your existing garage floor?
Putting drain in existing garage floor is possible, provided it is approved by the local building authorities. Authorities are quite concerned about the possibility of garage chemicals getting into the stormwater drainage system and causing ecological damage.
The 2021 International Residential Code (IRC) Section 309.1 stipulates
Garage floor surfaces shall be of approved noncombustible material. The area of floor used for parking of automobiles or other vehicles shall be sloped to facilitate the movement of liquids to a drain or toward the main vehicle entry doorway.
This makes it clear that the IRC permits installing a drain in or near a garage to help in clearing out the water from the garage floor. The issue that local authorities may have with a garage drain are:
- Does the water going into the garage drain contain oil or other chemical contaminants?
- Where does the garage drain discharge to? Stormwater system, sewage system or to daylight?
It is a lot easier to install a drain when a new concrete garage floor is poured. Unfortunately, this is often not done. The garage slope is expected to take care of the drainage.
In reality the slope may not be very effective. The grade below the concrete floor also sinks & subsides at some spots, as the years go by. This soil movement is pretty common and normal. But as a result you may end up with a somewhat uneven floor. Water will pool in the low lying areas.
Putting Drain in Existing Garage Floor: Step-by-Step
In case your garage floor is uneven, resulting in water pooling, putting drain in existing garage floor is a practical solution. This can be challenging! Which is why I have broken down the entire process of putting drain in existing garage floor into 5 easy steps.
NOTE: Putting drain in existing garage floor can be a DIY project but it does require considerable skills, knowledge, effort & patience. Using a licensed & experienced contractor is highly recommended.
STEP 1: Draw the Plan
You always need a plan if you want to get anything done right. In construction work you need layouts and drawings with accurate measurements. You will need to do this for your garage drain project as well.
From your experience with water pooling you will know the low spots on the garage floor. However, you should not be putting a drain inlet at every low spot. It will look awful.
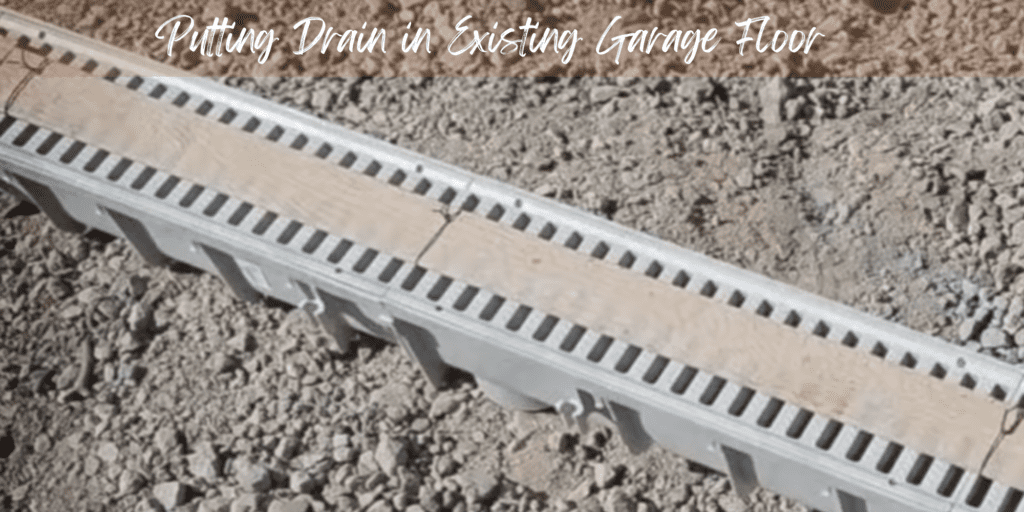
I recommend using Trench Drains or better still, U-Drains (aka Slot Drains). These can be laid out in straight lines and lead to the main drain. Do you like washing your cars in the garage? Lay out the U-Drains as a rectangular perimeter around the wash area.
It is better to incorporate a Sump Pit in your drainage plan. A sump pit is typically a one foot hole that traps the debris before water flows out into the public drainage system. If required a submersible pump and an oil separator can be incorporated in the sump pit.
You must clearly indicate where all the water from the garage drain will go. The Water Quality Control Board and the local Wastewater Treatment departments will be most concerned about that.
A detailed garage floor drain diagram will certainly be required to get the permit.
STEP 2: Get the Permit
You can not and should not start digging up your garage floor without getting a permit from the local authorities. Every construction or remodeling project requires a permit and putting a drain in your existing garage floor is no exception.
The permit rules are not uniform across the country or even across the state. Every local authority has its own rules. Most will have an online presence. You can visit the website for information. Applications can also be often made online.
You may, for example, need a clearance from the Regional Water Quality Control Board before you can even apply for the permit to build a drain in your garage.
If you do not like paperwork then let your contractor handle this. They know the rules!
STEP 3: Dig the Garage Trench Drain
You will need to use a concrete saw and a jackhammer to dig the garage trench drain. You are unlikely to own such equipment, but no worries. You can usually rent them. Of course you also do not have to worry about it if you have outsourced the job to a contractor.
Mark out the outline of the trench according to the garage floor drain diagram that you made in STEP 1. Use the concrete saw to cut along the edges. This ensures you will get a clean cut.
You can then go to work on the garage floor with the sledge hammer. Dig the hole deep enough to accommodate the drain and allow for a slope of 2% or more. You will also need to dig deeper where you need to incorporate the P-Trap or Sump Pit.
The hole that you dig must go all the way from the garage to stormwater or sewer drains, as the case may be. A garage floor drain to daylight is also an option, if permitted by the authorities.
Digging the garage trench drain, is without doubt, the most difficult and backbreaking part of the process!
STEP 4: Lay the Drain Pipes
Laying the pipe is relatively easy. But you have to be very careful with your workmanship. You do not want any leaky joints that come back to haunt you later. Any leaks will destroy the concrete floor, sooner than you think!
Another important factor is the slope. The drain pipe should slope gradually but consistently towards the exit point of the water. Position the channel carefully in the trench such that the top is perfectly aligned to the garage floor surface.
I recommend the use of either:
Source 1 Drainage Trench & Driveway Channel Drain
or
Vodaland – Stainless Steel Slot Drain System.
Both allow smooth flow of water and are pretty easy to clean. The sump pit at the end of the drain system is also helpful in cleaning out the debris, from time to time.
STEP 5: Finishing Touch
After you have laid out the pipe you may want to pour a few buckets of water down the drain to ensure there are no leaks. Once satisfied, cover the drain inlet with tarp and fill up the trench hole with self-leveling concrete, for a good finish.
Ensure that the concrete gets into every nook & cranny of the trench hole. Use a trowel to smooth the new concrete and make it level with the drain channel top and the old garage floor. Remove the tarp just before the concrete starts to set.
There is bound to be a color difference between the new concrete pour and the existing garage floor. Wait for a month so that the new concrete has fully cured. Seal the new concrete with a penetrating sealer
This is a good opportunity to give your garage floor a fresh, new look! A apply a coat of primer and a couple of coats of epoxy garage floor paint such as Rust-Oleum Concrete and Garage Floor Paint.
Your garage floor drain retrofit is now complete!
Thank you very much for reading the post. I do hope you found it informative and useful.