How To Finish A Garage Door Opening? Comprehensive Guide
As an Amazon Associate, I earn from qualifying purchases.
How To Finish A Garage Door Opening?
How to finish a garage door opening is an important aspect of any garage construction project. It ensures that your garage door is properly installed and that your garage is secure and weathertight.
Here is a step-by-step guide on how to finish a garage door opening:
- Measure the garage door opening: Measure the width and height of the opening from the outside of the framing. Be sure to measure at multiple points to ensure that the opening is square.
- Frame the garage door header. The header is the horizontal beam that supports the weight of the garage door. It is important to frame the header correctly to ensure that it is strong enough to support the load.
- Frame the garage door opening: This involves the installation of the side boards and the center board.
- Frame the garage door jambs. The jambs are the vertical framing members that support the sides of the garage door. They should be framed plumb and level to ensure that the garage door operates smoothly.
- Install the garage door threshold. The threshold is the horizontal piece of wood that seals the bottom of the garage door opening. It is important to install the threshold correctly to prevent water and pests from entering your garage.
- Trim the garage door opening. The trim is the finishing touch on the garage door opening. It helps to conceal the framing and give the opening a polished look.
The garage door opening size should be the same size as the garage door, after the trim boards have been put in place. Without the trim boards and the threshold seal, the garage door rough opening should be 3” wider and 1 ½” taller.
Standard off-the-shelf Garage Doors come in standard sizes. Custom designed garage doors in a size of your choice can of course be made.
Non standard sized garage doors take a lot more time and cost a lot more too!
It is best to settle for one of the standard garage door sizes. Which in turn means that you have to be very sure of how to finish a garage door opening.
In this post I shall be explaining about the important measurements that you need to take for garage door opening, how to take them, how you frame the garage door header, and how you frame and trim a garage door opening.
1. Measure the Garage Door Opening
Of course you need to measure the width and the height of the garage door opening to arrive at the correct size of the new garage door that you should be ordering.
Width
Measure the width, using a tape measure, both at the bottom and at the top end of the garage door opening. If the two width measurements are exactly the same, then that is just perfect.
However, if there is a slight difference, then you have to let your door dealer know. He will likely have a corrective solution to your problem.
Height
When it comes to measuring the height, you must measure it at three points. Measure the height at the left and right ends and also at the center of the garage door opening.
A two car garage door will be at least 16 feet wide. There is always the risk of the header sagging a bit at the center. Once again, let your garage door dealer know. He will suggest a solution.
Headroom
You also need to measure the height of the headroom. Headroom is the space between the top of the garage door opening and the garage ceiling or the lowest point of any obstruction such as a beam or a duct.
Headroom is important and must be a minimum of 12” to accommodate the horizontal garage tracks and the sectional garage door in the open position. Add another 6” if you are planning to install an overhead garage door opener.
If you do not have this space available you may have to settle for a wall mount garage door opener. On the other hand if you have a much larger headspace, you can consider installing a high track. A high track helps you maximize overhead storage space.
Side-room
Finally you need to measure the side-room, that is the space between the garage wall and the side of the garage door opening. This is required for the vertical tracks. Further, if this is too narrow, the door installer will not have enough workspace during garage door installation.
A typical two car garage should be 24’ wide and 24’ – 30’ deep. This is pretty good for a 16’ wide garage door (a standard size). It gives the door installer 4’ of workspace on each side.
In any case the side-room has to be a minimum of 12”. Considering that the absolute minimum dimensions of a two car garage door are 20’ X 20’. You will have that side-room. But this will be a really compact two car garage with practically no wiggle room.
Backroom
This may become critical if you have a particularly short garage or have some obstruction at ceiling level. The minimum backroom requirement (from the door header to the nearest obstruction) is garage door height + 4’.
Usually this will be the least of your concerns.
2. How do you Frame a Garage Door Header?
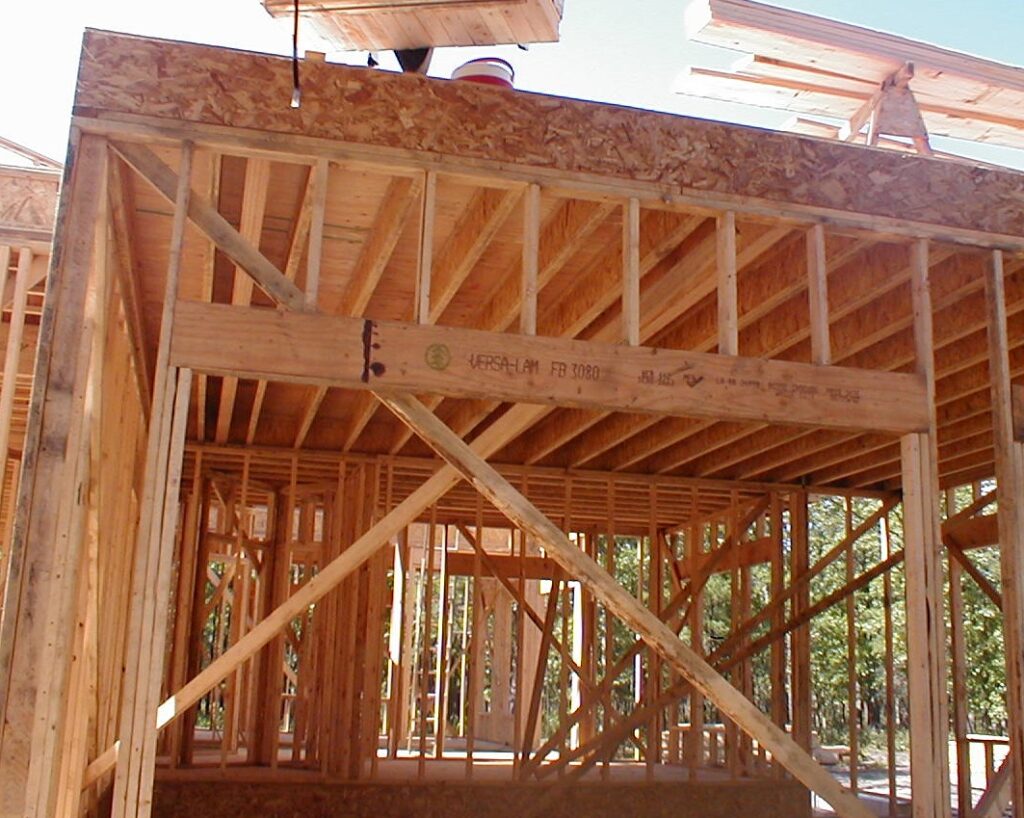
The garage door header is a very important part of the garage door frame. The Garage Door Header is typically a micro laminated beam that is at least 12” wide. It is common to use two 2X12 nailed together for strength.
Two Car Garage
Of course the length of the garage door header has to be more than the width of the garage door it needs to span. For a 16’ garage door the garage door header should be 16’ 9”.
The height of the garage door header should be 1 ½” more than the garage door height when measured from the garage floor.
Single Car Garage
A standard single car garage door is 8’X7’. The garage door header should therefore be 8’ 9”. If the header is not load bearing then a 2X12 should be OK.
Step-by-Step Installation
Installation certainly requires some help. You may also need to use one or two step ladders in the middle for temporary support.
Here are the steps on how to frame the garage door header:
- Cut the two pieces of 2×6 lumber to length. The length of the header should be equal to the width of the garage door opening plus 6 inches.
- Cut the four pieces of 2×4 lumber to length. The length of the header supports should be equal to the height of the garage door opening plus 6 inches.
- Nail the two pieces of 2×6 lumber together to form the header. Make sure that the header is centered over the garage door opening.
- Nail the four pieces of 2×4 lumber to the header to form the header supports. The header supports should be spaced evenly along the length of the header.
- Use a level to make sure that the header and header supports are level.
- Nail the header and header supports to the framing of the garage.
3. How do you Frame a Garage Door Opening?
Before you can hang your new garage door, the rough garage door opening needs to be finished. So how to finish a garage door opening?
Finishing the garage door opening really means installing all the lumber frames on which the garage door tracks, jambs, springs etc. can be anchored.
The Side Boards
Some folks will use 2X4 for the side board, but I think it is a lot better to use a 2X6 for the side board. Nailing and setting up the side board is also called setting up the goal posts by some.
It is a good idea to paint the 2X6 side boards while they are still down. It is certainly a lot easier. You can always touch up the bits that get scratched, later.
The Center Board
Another important piece is the center board. This goes right at the center and just above the garage door header. The torsion spring ends will be attached to this center board.
The centerboard should go all the way from the garage door header to the garage ceiling (or at least 24)” tall and around 12” wide.
Though not necessary, finish off the top of the garage door header with 2X6, just like the side boards to give a nice aesthetic look.
4. How do you Frame the Garage Door Jambs?
It is important to note that the garage door jambs are critical structural components of the garage. It is important to frame the jambs correctly to ensure that they are strong enough to support the weight of the garage door and to prevent the door from sagging.
Here are the steps on how to frame the garage door jambs:
- Cut the four pieces of 2×4 lumber to length. The length of the jambs should be equal to the height of the garage door opening plus 6 inches.
- Nail the two pieces of 2×4 lumber together to form the jambs. Make sure that the jambs are square.
- Place the jambs on either side of the garage door opening. Make sure that the jambs are centered over the opening.
- Use a level to make sure that the jambs are plumb.
- Nail the jambs to the framing of the garage.
5. How to Install the Garage Door Threshold?
The correct installation of the garage door threshold is important as it helps to keep water and pests out of the garage. Use treated lumber for the threshold to prevent rot and decay.
To install the garage door threshold:
- Cut the garage door threshold to length. The threshold should be equal to the width of the garage door opening.
- Place the threshold in the bottom of the garage door opening. Make sure that the threshold is centered over the opening.
- Use a level to make sure that the threshold is level.
- Nail the threshold to the framing of the garage.
6. How do you Trim the Inside of a Garage Door?
You can use wood or PVC trims for the inside of your wood, steel or aluminum garage door. To start off, you have to determine the width of the trim that you need.
So first you measure the thickness of the garage opening. Let us say it is made out of 2X6 then the depth would be 5 ½”. But if there is a ½” sheathing on the exterior then the thickness becomes 6”.
Now there is going to be another 2X6 board on the interior. In order to keep it flush, you need to add another 1 ½” to the 6”. In other words you need a trim material that is 7 ½” wide.
You start off by nailing the trim to the top end of the garage door opening. The process is the same when you are doing the sides, except that the garage floor is not perpendicular to the side.
Garage floors always pitch towards the garage door (as per the International Building Code and to allow for easy drainage). So you have to take the slope angle when cutting the side trim.
TIP: Space nails around 16” apart along the length of the trim board.
Finish off the edges by using a brick mold.
Bottom Line
How to Finish a Garage Door Opening? To be honest it is not an easy job. Unless you are a serious and very experienced DIYer, leave it to the pro. But if you think you can do it I would still recommend
- Watching quite a few YouTube Videos
- Talking to pros who have actually done this kind of work
- Talking to advisory staff at Home Depot, Lowes or a Garage Door Dealer
- Ensuring you have the right tools
- Absolutely making sure that you are using all the recommended Personal Protective Equipment (PPE) for the job
Thank you very much for reading the post. I do hope you found it informative and useful.