How To Seal Garage Door Gaps: A Comprehensive Guide
As an Amazon Associate, I earn from qualifying purchases.
Garage door gaps may seem a minor issue, but they can lead to big problems if not sealed.
From inviting pests and debris into your garage to driving up energy costs, these gaps can cause a range of frustrations. Cold drafts, melted snow, and rainwater leaks can also lead to water damage and discomfort.
Fortunately, knowledge of how to seal garage door gaps is easy and offers multiple benefits like better insulation, pest prevention, and water protection.
In this article, I shall walk you through how to seal garage door gaps effectively.
Whether you’re installing a bottom seal, applying weatherstripping, or adding a threshold seal, this guide will equip you with the knowledge to tackle the job yourself and create a more energy-efficient, pest-free garage.
Why Sealing Garage Door Gaps is Important
A well-sealed garage door is more than just a cosmetic improvement—it’s a practical necessity. Gaps around your garage door can cause a host of problems, from rodents and insects to water damage and higher energy costs.
Here’s why sealing garage door gaps should be a priority:

1. Improve Energy Efficiency
Gaps allow cold drafts and hot air to pass through, making it harder to regulate your home’s temperature. By sealing these openings, you reduce heat loss in winter and keep the garage cooler in summer.
A well-sealed garage door improves energy efficiency and lowers your energy costs.
2. Keep Pests and Rodents Out
A small gap is all it takes for rodents, spiders, and insects to invade your garage. Once inside, they can damage stored items, create nests, and even find their way into your home.
Proper sealing prevents these unwelcome guests from gaining entry.
3. Prevent Water and Weather Damage
Rain, snow, and even high winds can force water entry through unsealed gaps. Water infiltration in your garage will damage the garage floor and even the foundation.
The presence of water and a damp garage floor promotes mold growth. Additionally, unsealed doors can let in leaves and debris, making your garage messy and harder to maintain.
Seals block these elements, protecting both the door and items stored in the garage.
4. Protect Your Garage Door and Contents
Gaps expose your garage to unnecessary wear from the elements. This can reduce the lifespan of the door itself and damage tools, equipment, or belongings stored inside.
Sealing garage door gaps is a simple way to make your garage more functional, secure, and cost-effective. By the end of this guide, you’ll have all the knowledge you need to protect your space from these common challenges.
Identifying Common Garage Door Gaps
Before you can fix the gaps in your garage door, you need to know where they are. Gaps can occur in several places, and each requires a specific solution.
Here’s a simple guide to identifying problem areas:
1. Bottom Seal Gaps
The bottom seal is one of the most common culprits. Over time, the seal can wear out, crack, or flatten, leaving a gap between the door and the floor. This gap allows water, debris, and even small pests to enter.
2. Sides and Top Gaps
The sides and top of your garage door may have gaps if the weatherstripping has deteriorated or is missing. These gaps let in cold drafts, rainwater, and wind, undermining your garage’s insulation.
3. In-Between Panel Gaps
For sectional garage doors, the joints between panels may develop gaps. These in-between panel seals wear out over time, leading to drafts and inefficiencies.
4. Threshold Seal Issues
An uneven garage floor, a misaligned garage door, or a missing threshold seal can create gaps at the base of the door. This type of gap is particularly troublesome for keeping out melted snow, rainwater, and rodents.
How to Check for Gaps
- Daylight Test: Close the garage door and look for light peeking through any edges or panels.
- Feel for Drafts: On a windy day, check for moving air near the door.
- Look for Evidence: Water pooling and stains, debris, or pest activity near the gaps indicate a problem.
By identifying these common areas, you can choose the right garage door seal products and address the issues effectively.
Tools and Materials Needed for Sealing Garage Door Gaps
Before you begin sealing your garage door, gather the right tools and materials to make the process hassle-free. Having everything on hand will save you time and ensure a professional-looking result.
Essential Tools
- Measuring Tape: To measure gaps and cut seals to the right size.
- Utility Knife or Scissors: For trimming weatherstripping or rubber blade seals.
- Screwdriver or Drill: To secure seals with screws if needed.
- Adhesive Gun: For applying sealant or glue to fix threshold seals or other materials in place.
- Cleaning Supplies: Rags, mild detergent, and a scraper to prepare the surface for proper adhesion.
Key Materials
- Weatherstripping: For sealing sides and top gaps effectively. Options include V-seals and brush-style top seals.
- Rubber Blade Seals: Ideal for replacing a worn-out bottom seal.
- Threshold Seals: Useful for uneven floors and extra protection against water entry and debris.
- In-Between Panel Seals: For sectional doors with gaps between panels.
- Adhesive or Fasteners: To securely attach seals.
Optional Extras
- Insulation Kits: For added temperature control.
- Weather-Seal Tape: For temporary fixes or additional reinforcement.
Once your tools and materials are ready, you’ll be well-equipped to tackle the gaps in your garage door. A little preparation goes a long way in ensuring a smooth and successful DIY project!
Step-by-Step Guide to Seal Garage Door Gaps
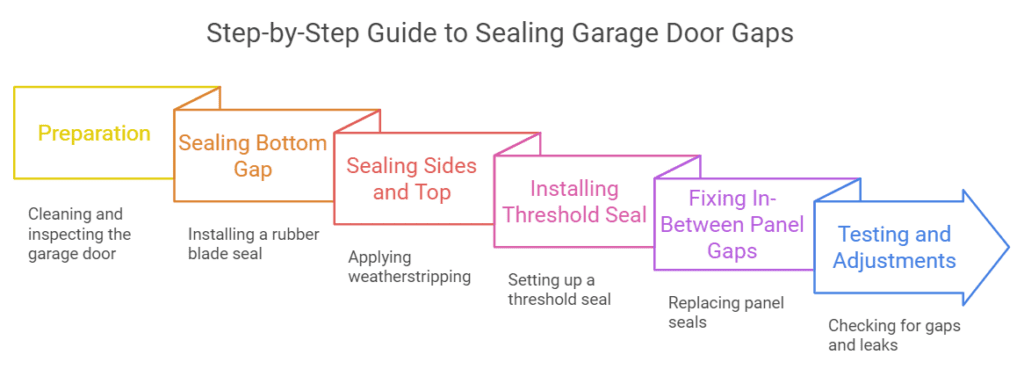
This step-by-step guide will walk you through sealing all types of garage door gaps.

1. Preparation
Before starting, you need to prepare the garage door and surrounding area:
- Clean the Surface:
- Remove dirt, grease, and old seal remnants using a mild detergent and scraper.
- Dry thoroughly to ensure adhesive or new seals bond effectively.
- Inspect for Damage:
- Check the garage door track, panels, and frame for structural issues. Address these before sealing.
- Measure the Gaps:
- Use a measuring tape to determine the size and length of gaps. This will help you select the right garage door seal products.
2. Sealing the Bottom Gap
The bottom seal prevents water entry, debris, and pests. Here’s how to replace it:
Tools/Materials: Rubber blade seal, screwdriver, utility knife.
Steps:
- Remove the old bottom seal by sliding it out of the track or unscrewing it if secured with fasteners.
- Clean the track thoroughly to remove dirt and rust.
- Cut the new seal to the required length using a utility knife.
- Slide the new rubber blade seal into the track or attach it using adhesive or screws.
- Test the door by closing it to ensure the seal fits snugly against the floor.
Benefits: This simple step blocks water leaks and creates a barrier against rodents and insects.
Recommended: DGSL Garage Door Bottom Seal
Universal garage door weatherstrip with U-shape + O-ring design, durable rubber, 7 insulation layers, easy installation, and customizable length for weatherproofing.
3. Sealing the Sides and Top
Weatherstripping is ideal for sealing gaps along the sides and top of the garage door.
Tools/Materials: Weatherstripping (e.g., V-seals, brush-style top seals), scissors, adhesive.
Steps:
- Measure and cut the weatherstripping to fit the door’s sides and top.
- Apply adhesive along the edge of the door frame where the seal will be installed.
- Attach the weatherstripping, pressing firmly to ensure it sticks securely.
- Test by closing the door and checking for any gaps or air drafts.
Benefits: Keeps out cold drafts, wind, and pests while improving energy efficiency.
Recommended: Garage Door Seal Top & Sides (Weatherstripping)
Garage Door Seal Top & Sides (Weatherstripping)
Durable EPDM rubber garage door seal blocks cold air, rain, and debris. Keeps your garage cleaner, saves energy, withstands wear, and installs easily with self-adhesive backing.
4. Installing a Threshold Seal
For uneven floors, a threshold seal can create a barrier against water leaks and melted snow.
Tools/Materials: Threshold seal, adhesive gun, measuring tape.
Steps:
- Clean the garage floor where the seal will be applied. Ensure it’s free of dirt and moisture.
- Measure and cut the threshold seal to the width of the garage door.
- Apply adhesive to the bottom of the seal and position it on the floor.
- Press down firmly and let the adhesive set as per the manufacturer’s instructions.
- Close the garage door to ensure the threshold seal aligns with the bottom of the door.
Benefits: Adds extra protection against rainwater, debris, and pests.
Recommended: Universal Garage Door Bottom Threshold Seal
Universal Garage Door Bottom Threshold Seal
20ft flexible garage door seal made of durable EPDM rubber. Blocks water, debris, and drafts saves energy, and withstands extreme weather. Easy to cut and install.
5. Fixing In-Between Panel Gaps
For sectional doors, in-between panel seals are required for insulation and draft prevention.
Tools/Materials: Replacement panel seals, adhesive.
Steps:
- Inspect the panels for worn or missing seals.
- Remove any damaged seals and clean the panel edges.
- Cut the replacement seals to size and attach them using adhesive.
- Let the adhesive set and test the door by opening and closing it to ensure the seals stay in place.
Benefits: Prevents air leaks and improves overall door performance.
6. Testing and Adjustments
Once you’ve installed all the seals, it’s time to test your work:
- Light Test: Close the garage door and check for any light penetration around the edges or bottom.
- Draft Test: On a windy day, check for air leaks by running your hand along the edges.
- Water Test: Spray water around the door to ensure no moisture gets through.
Make adjustments as needed, such as tightening seals or reapplying adhesive.
Sealing your garage door gaps may seem like a lot of steps, but each one plays a critical role in keeping your garage protected from rodents, rainwater, and cold drafts. With a bit of effort, you’ll have a secure, weatherproof door that’s ready to stand up to the elements.
Choosing the Right Garage Door Seal Products
Ensure you buy the right garage door seal products. There are a wide range of options available, so understanding their features will help you choose the best materials for your garage door gaps.
Here’s a breakdown of popular seal types:
1. Rubber Blade Seals
- Best For: Bottom gaps.
- Features: Flexible, durable, and resistant to extreme weather conditions.
- Advantages: Ideal for keeping out water, debris, and pests. Easy to install and cost-effective.
2. Threshold Seals
- Best For: Uneven floors or added protection at the base of the door.
- Features: Made from heavy-duty rubber or vinyl.
- Advantages: Excellent for blocking rainwater, melted snow, and drafts. Provides extra insulation when paired with a bottom seal.
3. Brush-Style Top and Side Seals
- Best For: Sides and top gaps.
- Features: Nylon or synthetic brushes attached to an aluminum strip.
- Advantages: Effective for sealing against insects, rodents, and small debris without impeding door movement.
4. V-Seals and Weatherstripping
- Best For: Sides, top edges, or frame gaps.
- Features: Made from rubber or vinyl, with adhesive backing.
- Advantages: Easy to install and excellent for improving energy efficiency by sealing cold drafts.
Tips for Choosing High-Quality Seals
- Look for UV-resistant materials for durability.
- Check compatibility with your garage door type.
- Opt for products with strong adhesives or installation hardware.
Quick Comparison & Summary
| Seal Type | Best For | Features | Advantages | Drawbacks |
| Rubber Blade Seal | Bottom gaps | Flexible, weather-resistant rubber | Blocks water, debris, and pests; easy to install | May wear out faster in extreme climates |
| Threshold Seal | Uneven floors, base gaps | Heavy-duty rubber or vinyl | Excellent for waterproofing and insulation | Requires adhesive; not suitable for every door type |
| Brush-Style Seal | Sides and top gaps | Nylon or synthetic brush with aluminum strip | Seals rodents, insects, and debris effectively | May allow small drafts if not fitted properly |
| V-Seals | Sides, top edges, frame gaps | Adhesive-backed rubber or vinyl | Easy to install; improves energy efficiency | Adhesive may weaken over time in humid areas |
| In-Between Panel Seal | Sectional door panel gaps | Flexible material, often rubber or vinyl | Prevents air leaks; ensures smooth door operation | Requires precise alignment for installation |
PRO TIPS
- Choose a rubber blade seal for straightforward bottom seal replacements.
- For garages prone to water leaks, pair a threshold seal with other seals for maximum protection.
- Use brush-style seals or V-seals to address gaps along the sides and top for pest control and better insulation.
Maintenance Tips for Garage Door Seals
Sealing your garage door is a great start! Unfortunately, exposure to rainwater, debris, and temperature changes can wear out even the best materials., Regular maintenance ensures the seals stay effective for longer.
1. Inspect Seals Regularly
- Check for cracks, gaps, or wear in the bottom seal, threshold seal, and weatherstripping.
- Look for signs of damage caused by rodents, insects, or harsh weather.
2. Clean the Seals
- Use a damp cloth to wipe away dirt, debris, and mold.
- Avoid using harsh chemicals that can degrade rubber blade seals or weatherstripping.
3. Reapply Adhesive When Necessary
- If the adhesive on a threshold seal or weatherstripping weakens, remove the seal, clean the surface, and reapply fresh adhesive.
4. Replace Worn Seals Promptly
- Seals lose effectiveness as they age. Replace any damaged or deteriorated materials to prevent water leaks or drafts.
5. Perform Seasonal Checks
- Inspect seals during seasonal changes, as fluctuating temperatures can expand or contract the materials.
Cost Estimates for DIY Projects
Sealing garage door gaps is a relatively simple DIY project. Here are some cost estimates:
Materials:
- Bottom seal: $20–$40
- Weatherstripping: $20–$40
- Threshold seal: $20–$50
- Adhesive or fasteners: $5–$15
When to Call a Professional
However, at times you may need to call in a professional.
- Complex Installations: If your door is misaligned or the track needs adjustment.
- Custom Doors: For non-standard sizes or materials that require expertise.
- Severe Damage: Waterlogged wood or structural issues might need professional repair.
Professional Cost Estimate: $150–$500, depending on the scope of work.
Bottom Line
Sealing garage door gaps is one of the most practical upgrades you can make to your home. This DIY project is manageable for even amateur DIYers. Of course, you must have the right tools and materials.
Whether it’s replacing a bottom seal, installing weatherstripping, or adding a threshold seal, the steps are straightforward and the benefits are long-lasting. You’ll enjoy a cleaner, pest-free garage that stays insulated and weatherproof throughout the year.
Thank you very much for reading the post. I do hope you found it informative and useful.


