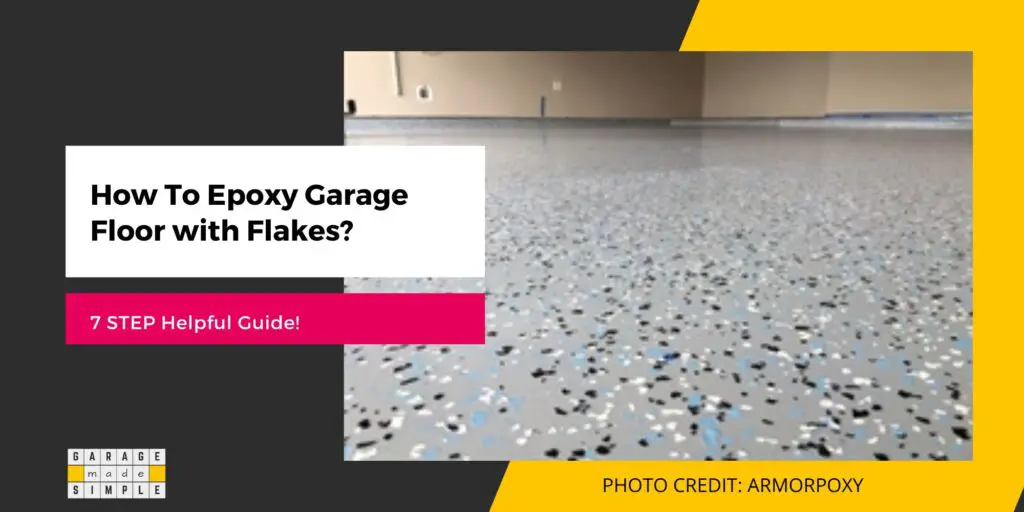
7 Step Helpful Guide On How to Epoxy a Garage Floor with Flakes
As an Amazon Associate, I earn from qualifying purchases.
How Do You Epoxy Garage Floor with Flakes?
Are you planning to apply an Epoxy coating with colored flakes on your garage floor? It is a great idea as you will get a unique and outstanding finish. You might wonder if you must engage a professional contractor to do the job. That will not be necessary, but you need to know how to do an epoxy garage floor with flakes.
You can epoxy your garage floor with flakes, yourself as a DIY project. The process is relatively simple and not very different from applying a standard Epoxy garage floor coating.
The main difference is in choosing & broadcasting the decorative flakes correctly. When epoxy coating a garage floor with flakes, you must overcoat the flakes with a hard wearing, durable, clear topcoat to lock them in.
In this post I will explain the five step process that you can use to epoxy your garage floor with decorative colored flakes.
But before that let me explain what decorative color flakes are and the benefits of an Epoxy garage floor with flakes.
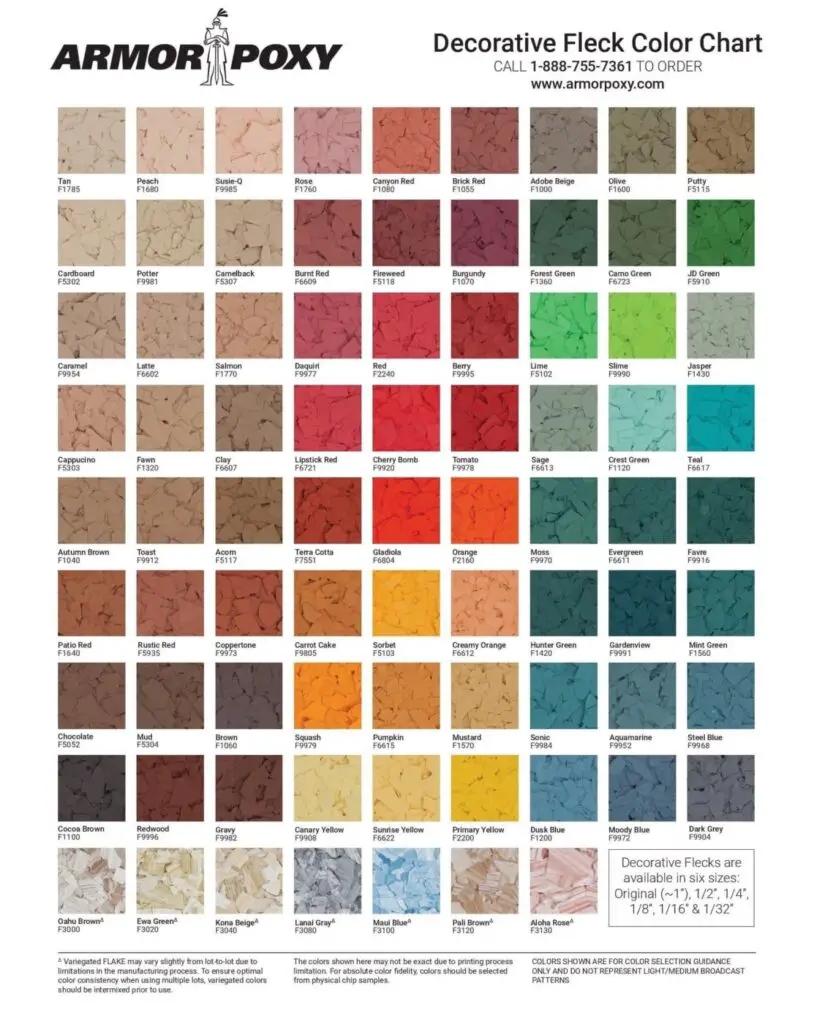
What are Decorative Color Flakes?
Decorative colored flakes used in epoxy floor coatings are polymer paint aggregates made from acrylic and vinyl resins.
The flakes are 4 – 5 mil thick. The size of the flakes can range from 1/32 inches to 1 inch. The ¼ inch size is most commonly used with epoxy floor coatings. The flakes do not have a regular shape.
The flakes are available in a wide range of colors. It is possible to buy them in single color packs and make your own color combination. However, this can be somewhat challenging. You will find using ready-made color combinations more convenient. You can be quite sure of the final finish.
The random shape of the flakes and the large range of color options, helps to create a unique garage floor design.
What Are the Benefits of an Epoxy Garage Floor with Flakes?
An epoxy garage floor with flakes results in several benefits:
Unique Aesthetic Looks
The most important reason for deciding to install an Epoxy garage floor with flakes is that you can get a truly unique & stunning looking garage floor. There is a large range of ready-made color combinations to choose from.
If you are creative you could even buy packs of different colored & sized flakes and create your own exclusive combination. Your garage floor could be like none other in the world.
Camouflages Floor Defects
The decorative color flakes are an excellent way to camouflage defects that may be there in the concrete or in the epoxy application. Cracks in the concrete floor or discoloration in the epoxy coating will not be visible.
Instead you will see a gorgeous epoxy garage floor with a stunning flake pattern.
Improves Floor Durability
The color decorative chips are extremely durable as they are formulated from acrylic and vinyl resins. The epoxy garage floor with flakes will become even more hard wearing and abrasion resistant.
Increased Protection due to Topcoat
A standard epoxy floor may or may not have a topcoat, but an epoxy floor with flakes must have a topcoat to seal in the flakes. When the flakes are broadcast on the base epoxy coat, not all of them will fall flat. Some will fall at an angle. While scraping will remove a lot of them, some will remain.
Encapsulating all the colored flakes in a clear topcoat will ensure they never get pulled out by vehicular or foot traffic.
The clear topcoat, which is often polyurethane, increases the toughness and flexibility of the Epoxy garage floor. Minor scratches will not show up on polyurethane due to the flexibility of the topcoat.
The polyurethane topcoat has a higher resistance to UV radiation. The vinyl chips are also UV stable. Together they ensure that there will be no fading or discoloration of the Epoxy floor.
You will not need to worry about partial fading or discoloration of the epoxy floor, in case your garage gets some sunlight through the open garage door or a window.
Improves Sound Insulation
The vinyl chips absorb sound vibrations. As such an epoxy garage floor with flakes will make your garage a bit quieter.
Step 1: Choosing the Finished Look
The first step of choosing the final finished look is the most exciting and fun part of the project. Make the most of it by involving your family members.
Unless you are a professional it is best to go for one of the custom designed flooring options. You can be pretty sure of the end result. There will be no unpleasant surprises.
The starting point has to be the basic color that you want for your garage floor. Grays and tans are pretty popular. They tend to complement standard wall, shelving & bench colors in a garage.
You can of course choose to go bold with colors such as terracotta, aquamarine, sunrise yellow or lipstick red. After all, it’s your garage!
When it comes to choosing the color scheme you have to choose the color of the basecoat and the color of the decorative flakes combination. Typically they will be in the same or similar hue.
However, contrasting colors are also possible. For example, you can choose the color of the base epoxy to be midnight blue. Sprinkle flakes that are a combination of black, white and gold & silver glitter. You will have a mesmerizing night sky effect on your garage floor.
Broadcast Density
The visual effect depends, not just on the color combination. The broadcast density of the flakes will determine the final appearance too. The table below gives you the five main broadcasting categories along with the amount of flakes required.
| Broadcasting Category | For 100 sq ft | For (12’X20’) 240 sq ft 1 Car Garage | For (20’X24’) 480 sq ft 2 Car Garage |
| Light Broadcast | 0.25 – 0.50 lbs | 0.60 – 1.20 lbs | 1.20 – 2.40 lbs |
| Medium Broadcast | 0.50 – 2.00 lbs | 1.20 – 4.80 lbs | 2.40 – 9.60 lbs |
| Heavy Broadcast | 2.00 – 4.00 lbs | 4.80 – 9.60 lbs | 9.60 – 19.20 lbs |
| Super Heavy Broadcast | 4.00 – 9.00 lbs | 9.60 – 21.60 lbs | 19.20 – 43.20 lbs |
| Full Broadcast | 10.00 lbs | 24.00 lbs | 48.00 lbs |
Add the extreme end you have a full broadcast. In the case of a full broadcast, the base coat is completely covered in flakes. Any additional broadcasting of flakes will no longer adhere, as the flakes can no longer come in contact with the base coat.
The base coat for a full broadcast could be any color. However a light gray or beige would be ideal. To be honest, a full broadcast is not very popular among garage owners. But if you do go with a full broadcast you can get a truly awesome epoxy garage floor.
Step 2: Surface Preparation
The success of any painting or coating application depends heavily on how well the substrate has been prepared. Poorly prepared concrete garage floors can lead to a host of problems for the primer and base coat application.
Lack of adhesion between the epoxy coating and the concrete floor is almost always because of improper surface preparation. Some of the important points to keep in mind when preparing the concrete floor for an Epoxy application are:
- Removing all dirt and dust on the floor
- Getting rid of oil & grease stains
- Ensuring the concrete is dry and has low moisture content
- Creating a rough surface profile for coatings to get a foothold
- Rinsing off residues from acid etching or cleaning solvents
- Grinding off topical sealer on the concrete
- Getting rid of hot tire pick up marks
I have covered this topic in great detail in my earlier post 14 Reasons Why Your Epoxy Garage Floor Is Peeling (Best Ways to Prevent).
Step 3: Epoxy Primer Application
Is priming necessary? You can get away without a primer coat if the substrate is not highly porous in patches and you have done an excellent job of surface preparation.
The truth, however, is that priming never hurt anybody. Yes, it does cost in money, time & labor, but you will most likely recover that by reduced consumption of the topcoat.
A concrete floor, with an Epoxy primer coat, will always result in a better, thicker and more uniform Epoxy topcoat. Concrete is pretty absorbent. The absorption rate is not uniform. So different sections may absorb epoxy on it to different degrees.
Application Epoxy topcoat, without a primer coat below, may result in a patchy finish. This is more likely if the topcoat is very light (such as, white, off white or beige) or heavily pigmented (such as deep reds & yellows).
For detailed instructions on how to apply an Epoxy Primer, refer to my earlier post How to Apply Epoxy Coating to Garage Floor (Helpful 7 Step Guide!).
Step 4: Base Epoxy Coat Application
The base coat which goes on top of the Epoxy primer can be either a polyaspartic coating or a 100% solid epoxy coating. The polyaspartic is more convenient to use. However, 100% solid epoxy will give a much thicker and more uniform film.
Armorpoxy Flake Polyaspartic Flooring Kit
Armorpoxy Flake Polyaspartic Flooring Kit is a one part polyurea / polyaspartic hybrid garage floor coating. It is extremely convenient to use, since it is one part and no mixing is required. It cures rapidly.
So, if you are running short on time, then Polyaspartic is the ideal base coat for you. You could complete your entire project within a day.
The kit is available in two pack sizes. The items included in the kit are as under:
| 300 SQFT Kit Contents (Enough for 1 Car garage) | 600 SQFT Kit Contents (Enough for 2 Car garage) |
| 1 quart prep/etch solution 1 tint pack for base coat 2 gallons SPGX polyurea 3 lb color-coordinated decorative flecks 1 pack Armorgrip clear non-skid additive 5 gallon mixing bucket with liner 2 wood mixing sticks, chip brush, rubber gloves, 2x 9″ roller pads, detailed instructions. | 1 gallon prep/etch solution 2 tint packs for base coat 4 gallons SPGX polyurea 6 lb color-coordinated decorative flecks 2 pack Armorgrip clear non-skid additive 5 gallon mixing bucket with liner 2 wood mixing sticks, chip brush, rubber gloves, 2x 9″ roller pads, detailed instructions. |
Installation of Armorpoxy II Kit is very easy to do and can be accomplished by a DIYer or a professional. Below are the instructions for the subfloor prep and for the installation of your new epoxy floor.
Printable Subfloor Prep Instructions.
Printable Installation Instructions.
Armorclad Master Kit with Topcoat
Armorclad Master Kit with Topcoat is among the highest grade garage epoxy floor kits available. The superior quality is due to its unique 100% solids Adaptive Molecular Technology. The technology allows the epoxy to bond better than other epoxies in the market.
Armorclad can be applied to any properly-prepared surface and covers 600 sqft. The kit is enough for a standard 2 car garage. The kit contains:
- ArmorEtch etching solution
- 3 gallons of 100% solids (the finest available) 2 part epoxy
- UltraGlaze 1-part industrial-grade non-yellowing clear topcoat
- Clear Grip Non Skid Additive
- 6 lbs of decorative epoxy flecks
- rubber gloves, industrial-type mechanical mixer (for your drill), mixing sticks, application squeegee, roller pad, instructions, and brush (for corners and edges)
- Comes packed in a reusable 6 gallon heavy duty mixing bucket.
Start off by mixing the two part 100% solids epoxy in a 5 gallon bucket in the ratio advised by the manufacturer. Mix thoroughly, using a power drill with a mixer attachment.
Put on your spiked shoes or sandals. Pour the mixture in ribbons across the garage floor. Then use a squeegee to spread the paint all over the garage floor. Take extra care when doing the floor edge with the wall.
Use a roller on an extension pole to smooth out the epoxy base coat. It is better to do smaller sections in case you have a large garage so that you can broadcast the flakes while the coating is still wet.
Alternatively, request your partner or friend to help. They can do the broadcasting while you are doing the rolling.
Step 5: Colored Flakes Broadcasting
You must broadcast the coloured flakes on to the base coat while it is still wet. The flakes need to sink a bit in the wet film so that adhesion is strong.
Roll the base coat on a section of 100 sq. ft. and then broadcast flakes on this section. Remember to wear spiked shoes. You can then walk on the wet film without leaving footmarks.
It is quite helpful if you have a helping hand. The other person can do the broadcasting soon after you have rolled the basecoat in a section.
The most common, and arguably the best, method is to keep the flakes in a 1 gallon can and sprinkle it by hand. Do not throw the flakes downwards onto the floor. Instead throw them up into the air, so that they spread out as they float down to the floor. This helps spread the flakes evenly.

Make sure to fill the 1 gallon can with flakes that weighs as per the requirement for a 100 square-foot section, depending on the category of broadcasting that you desire. For example if you are aiming for a medium broadcast, then keep between 0.5 to 2.0 pounds in the can. Make sure to use all of it on the 100 square-foot section.
Step 6: Scraping the Floor
Let the base coat, along with the colored flakes embedded in it, dry out for a day or two. The coating should be dry enough so that you can walk on it without leaving marks.
Use a semi-soft bristle broom or brush to sweep the floor. You will be able to collect all the flakes that did not stick to the base coat at all. However, there will still be a lot of flakes that are just loosely attached to the basecoat. These need to be scraped off.
You can easily make a scraper by attaching a 10 inch steel drywall taping knife to the end of an extension pole. The one you used for rolling the basecoat will do the job.
Push the scraper on the floor lightly as you walk in a straight line. With the right pressure you will remove only the colored flakes that are loose and not leave any marks or scratches on the floor.
Use a shop vac to suck in all the flakes that you have just scraped off. The shop vac will even suck out the flakes that are still very loosely attached to the base coat.
Note: In case of full broadcast, you will have quite a bit of leftover flakes on the floor. This is perfectly normal.
STEP 7: Protective Topcoat Application
The final step is to cover the base coat with flakes, with a protective layer of a clear topcoat. The clear topcoat will ensure that the color flakes get “locked in”. The colored flakes will get totally encapsulated within the clear coating.
You could use an epoxy clear topcoat. However, a clear polyurethane has additional benefits. Polyurethane (PU) is a lot more UV resistant than epoxy. A PU clear coat will prevent fading of the epoxy base coat. Epoxy has poor UV resistance. Normally this is not a problem as the garage floor usually does not get direct sunlight.
To apply the clear topcoat mix the 2 parts as per the manufacturer’s instructions. Pour the mixture in ribbons and use a ⅜ “ nap roller to spread the PU evenly on the floor.
Full Broadcast
A single coat will not be enough to bond with the colored flakes. Wait overnight and apply the second coat. You should add the non-skid additive in the liquid paint for the second coat.
Less than Full Broadcast
For a textured finish just one coat of the clear PU will be enough. Do keep in mind that the slight texture does not make the floor slip resistant. So you must add the non-skid additive in the liquid paint for the first coat itself.
Apply a second coat of the clear topcoat if you want to get a smooth floor finish.
An uneven application of the clear topcoat will not give your epoxy garage floor a mirror finish that you are striving for.
NOTE: Some clear coats appear white or milky when wet. This is natural and no cause for worry. The coat will become clear once it dries.
You should have a great looking epoxy garage floor with flakes. You can walk on it the next morning, but wait a few days for the epoxy and PU system to fully cure.
Congratulations on your stunning new epoxy garage floor with flakes!
Thank you very much for reading the post. I do hope you found it informative and useful.